
URL copied to clipboard

Add multi-language in the front-end
3 views
__readtime__ Min
read
To make the site multi-language it is not enough to add multi-language in the back-end only, you have to add multi-language for the front-end too so the user can see the content of your website in multi-language. After learning how to add multi-language in the back-end, let’s start to learn how to add multi-language in the front-end. To add multi-language in the front-end is a totally different concept from the back-end multi-language.
The default language for the front-end in TYPO3 is English. First, update the language in the back-end from French to English so it can be easier to understand how to add multi-language for the front-end. You can check in the “Set Backend Language” section to learn how to select the English language.
Add new language in the front-end
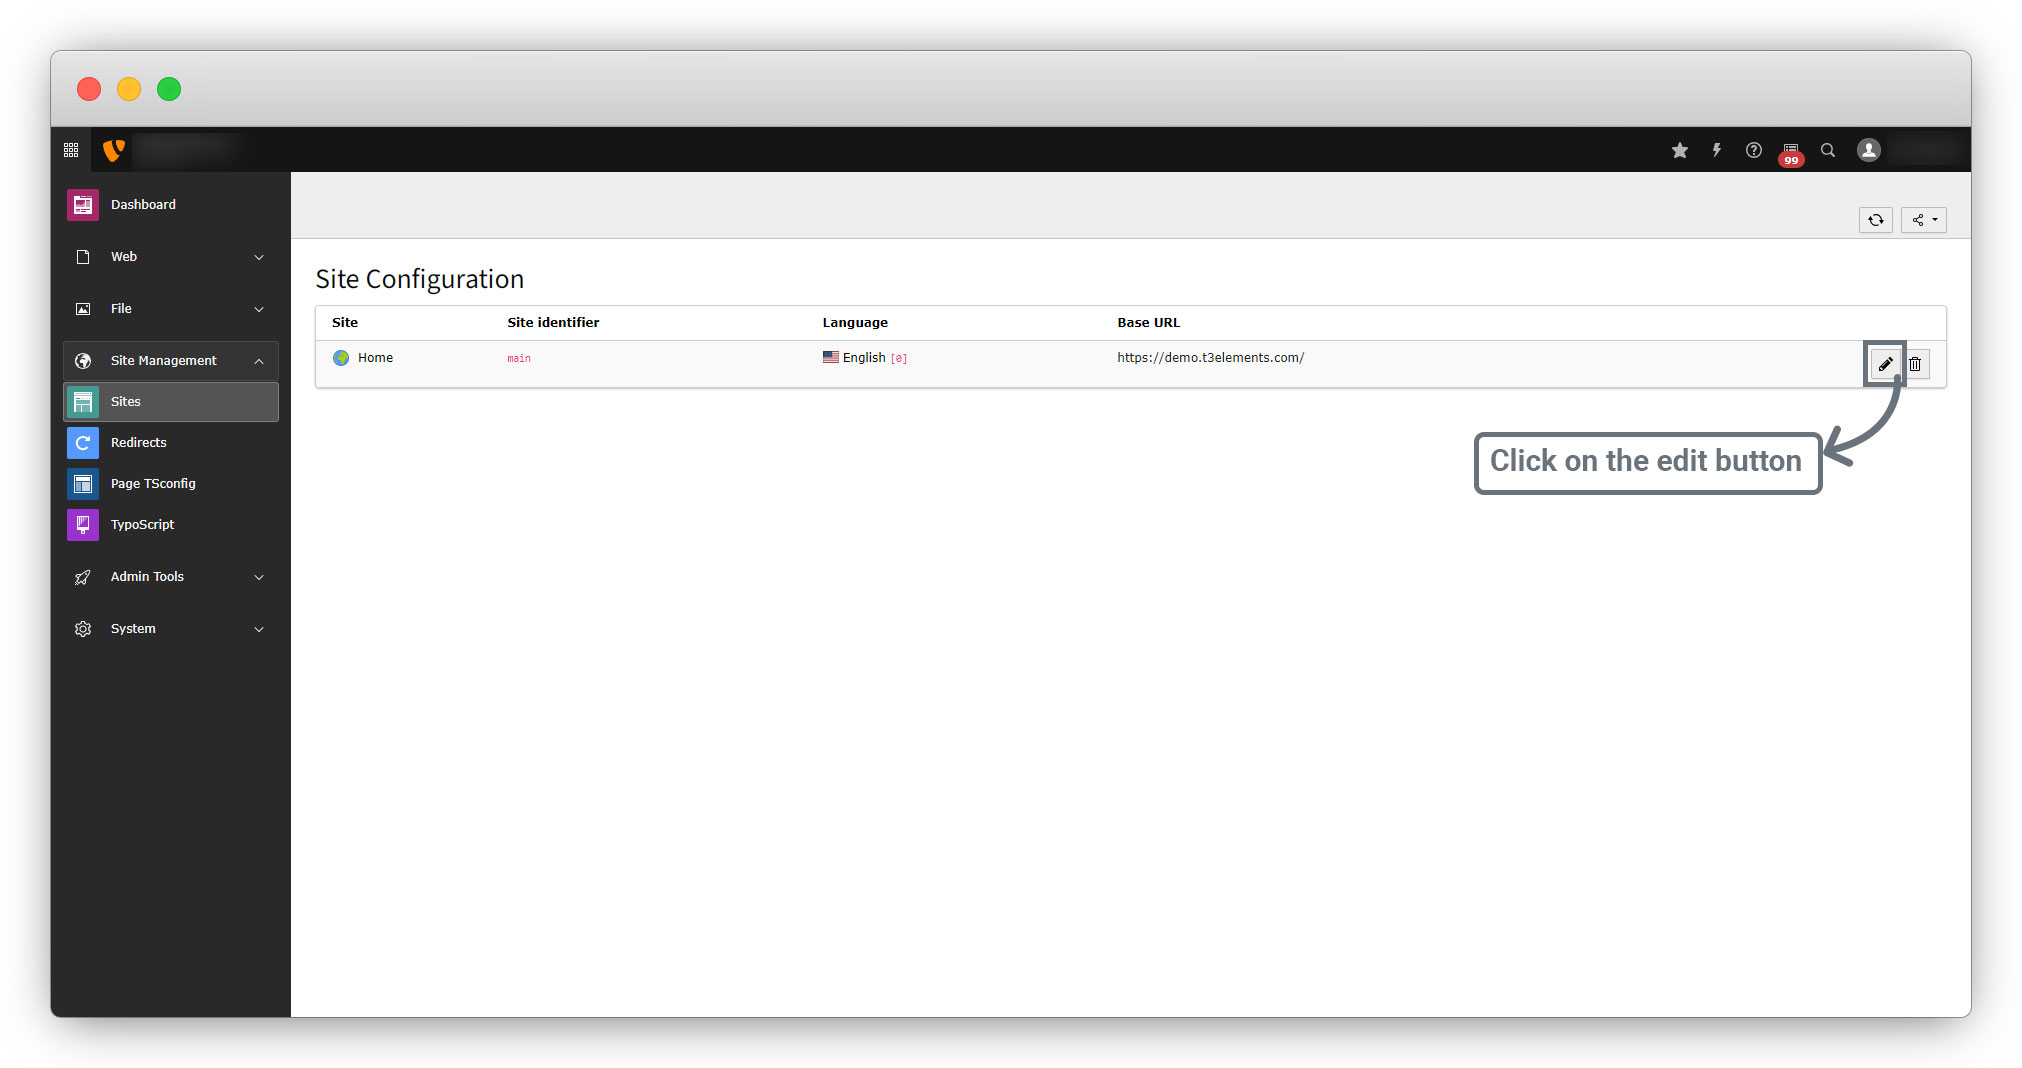
1. To add the multi-language in front-end go to the Site Management > Sites and you will see the screen as seen in the screenshot below, then click on the edit button:
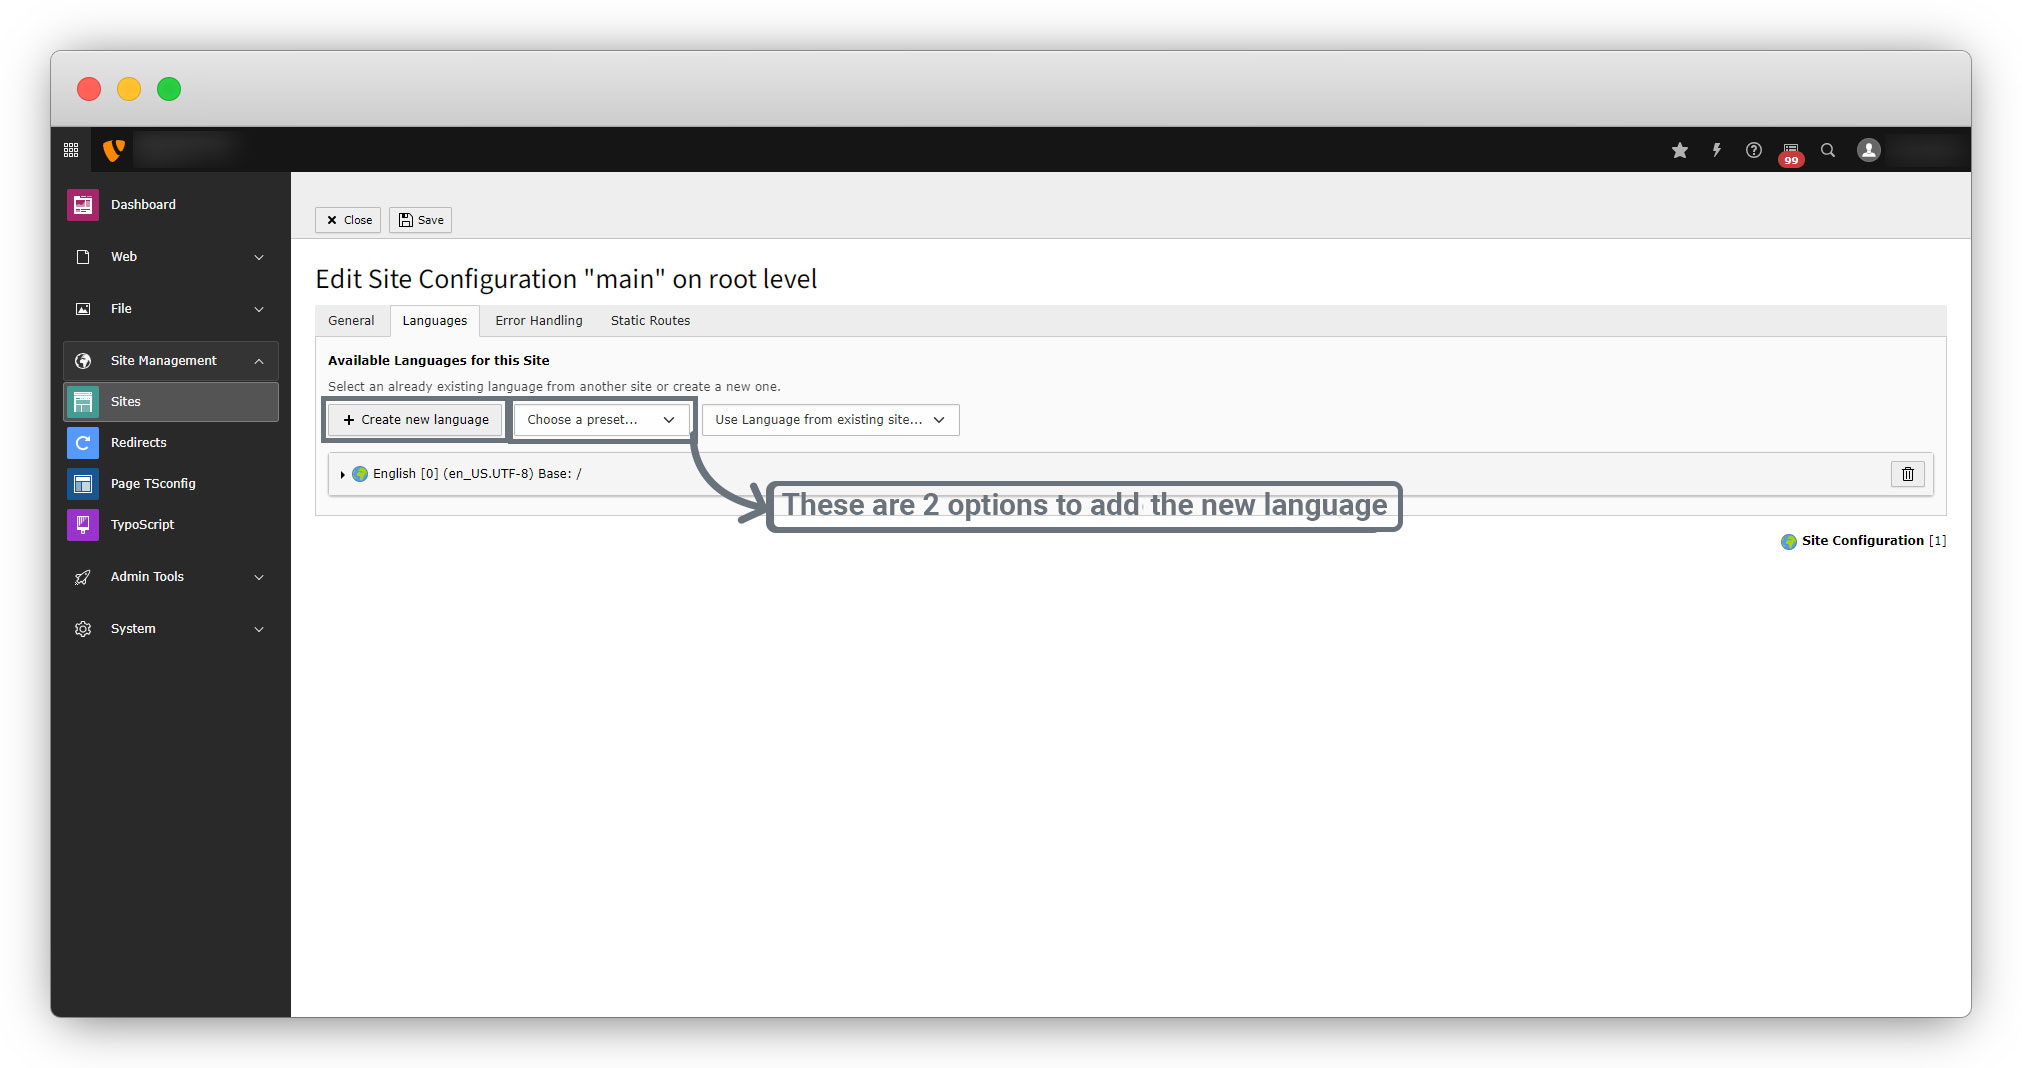
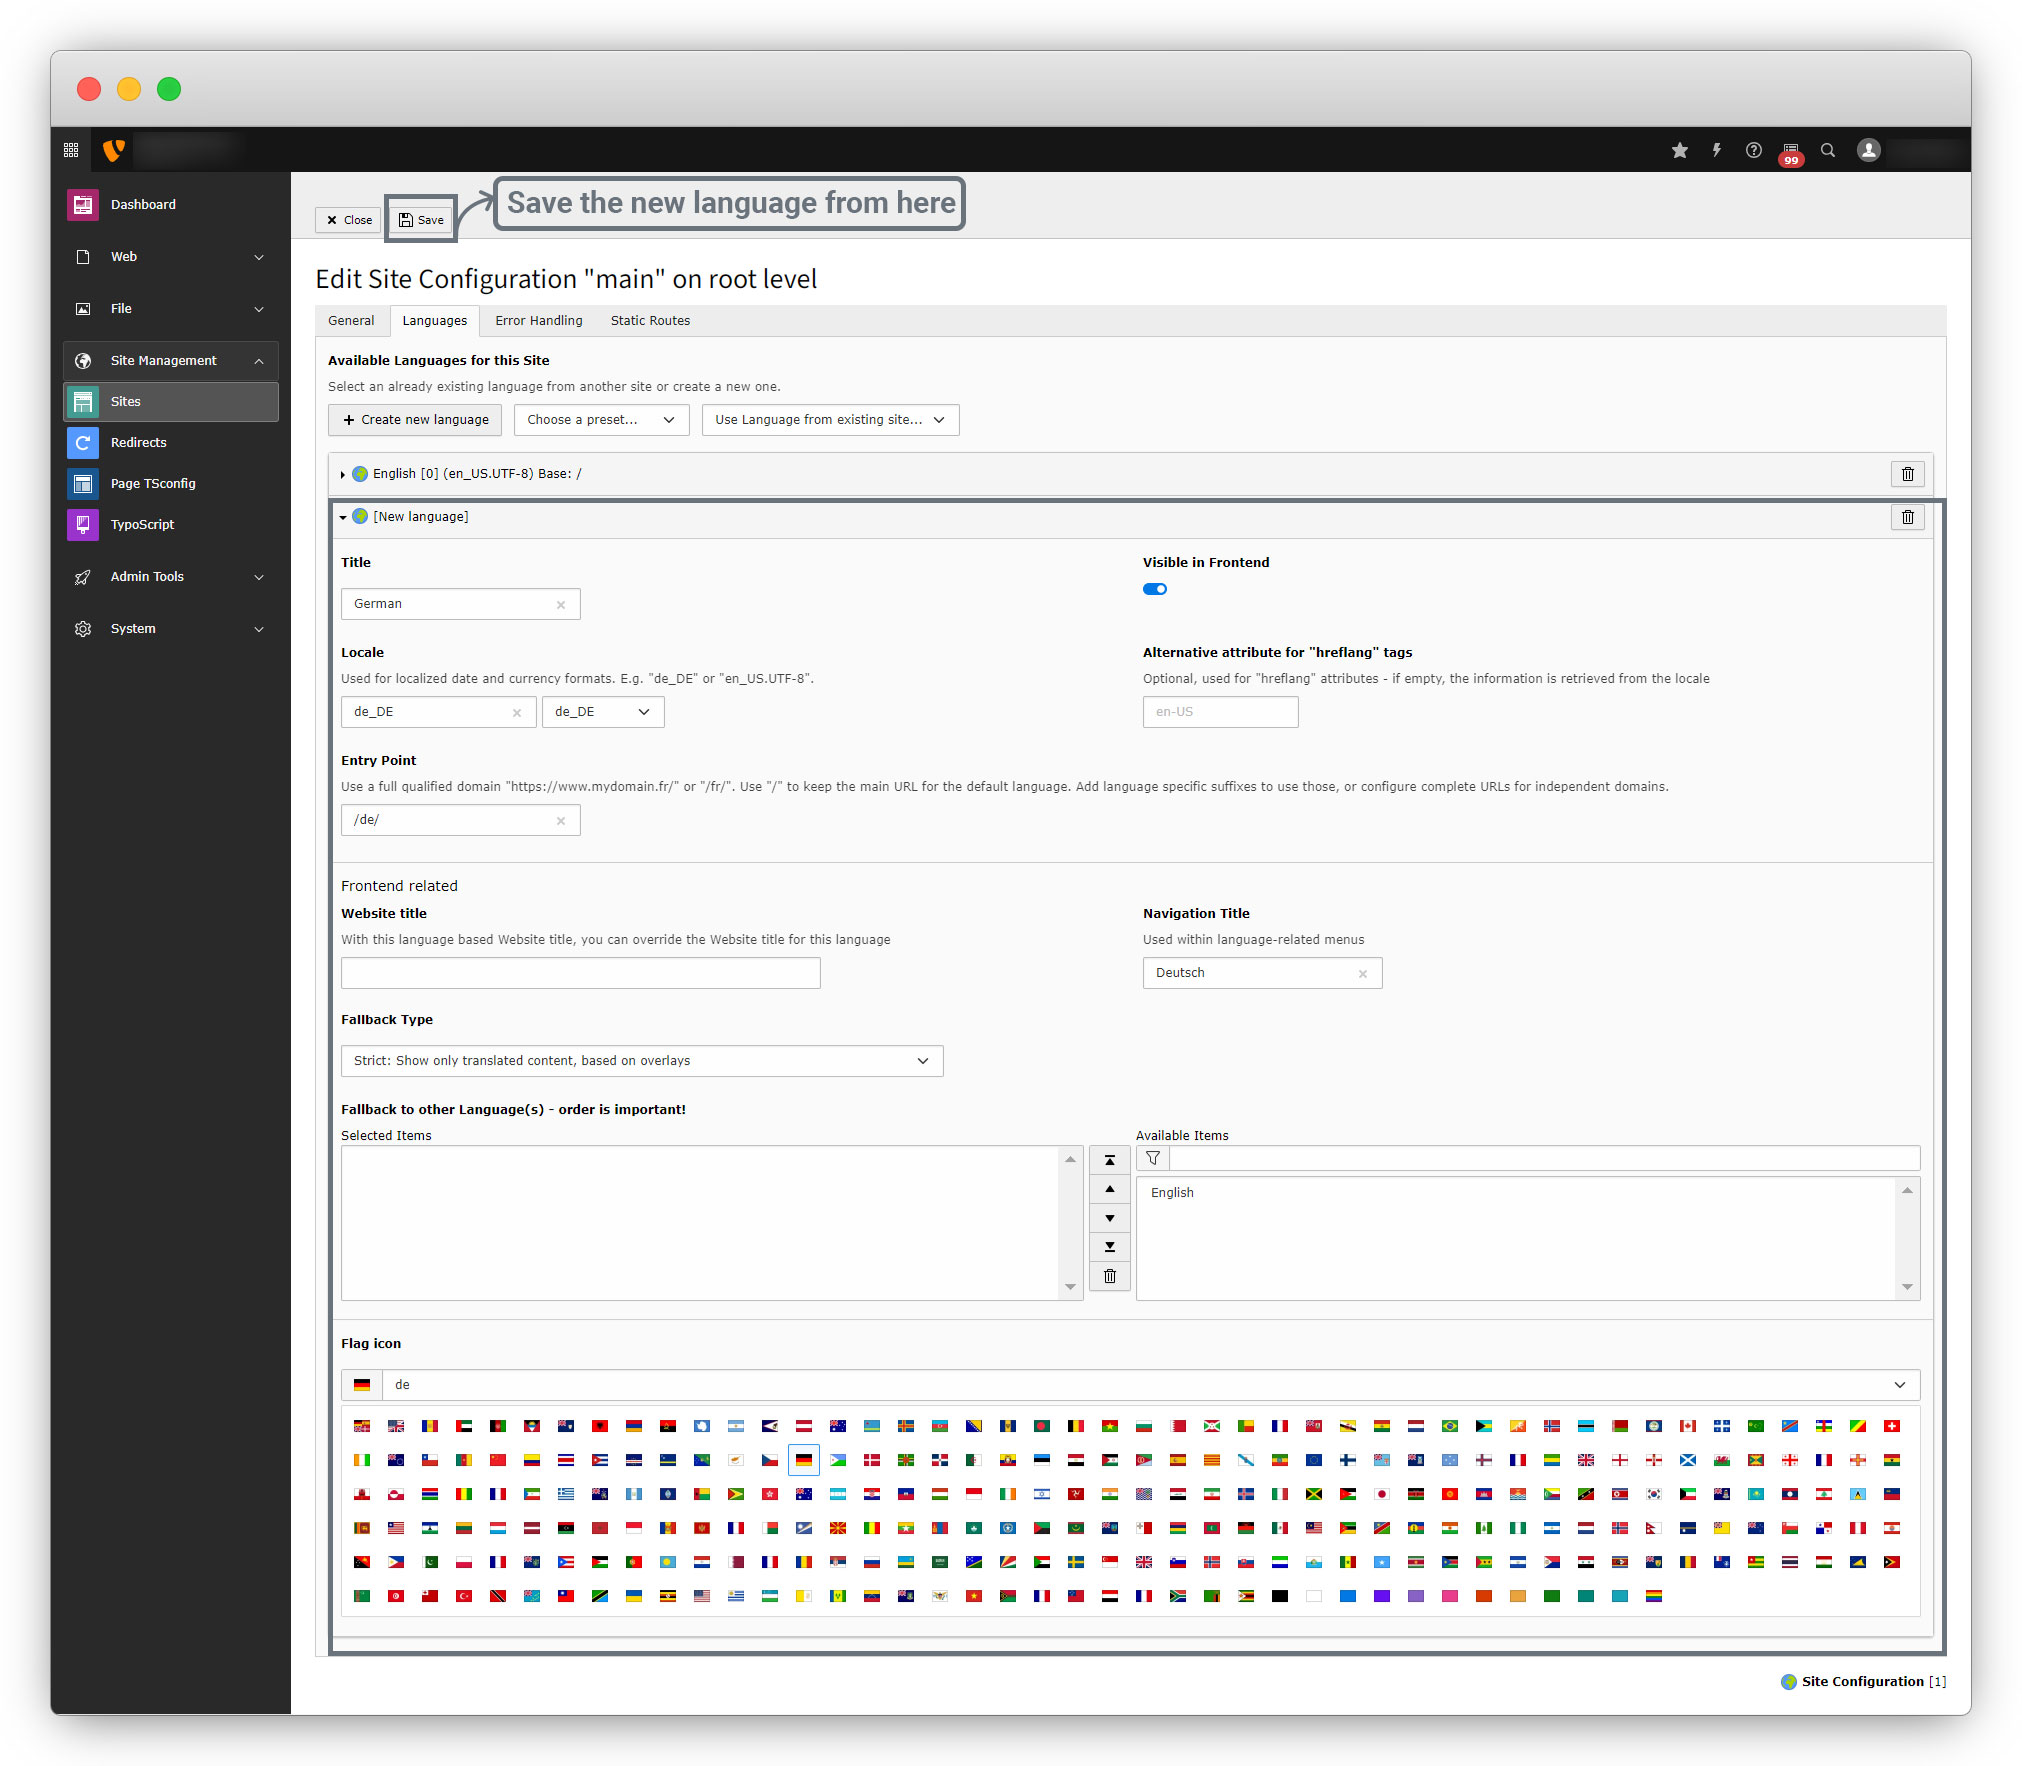
2. After clicking on the edit button, you will see the below screen. There are 2 options you can use to add the new language and those options are i) Create new language and ii) Choose a preset….
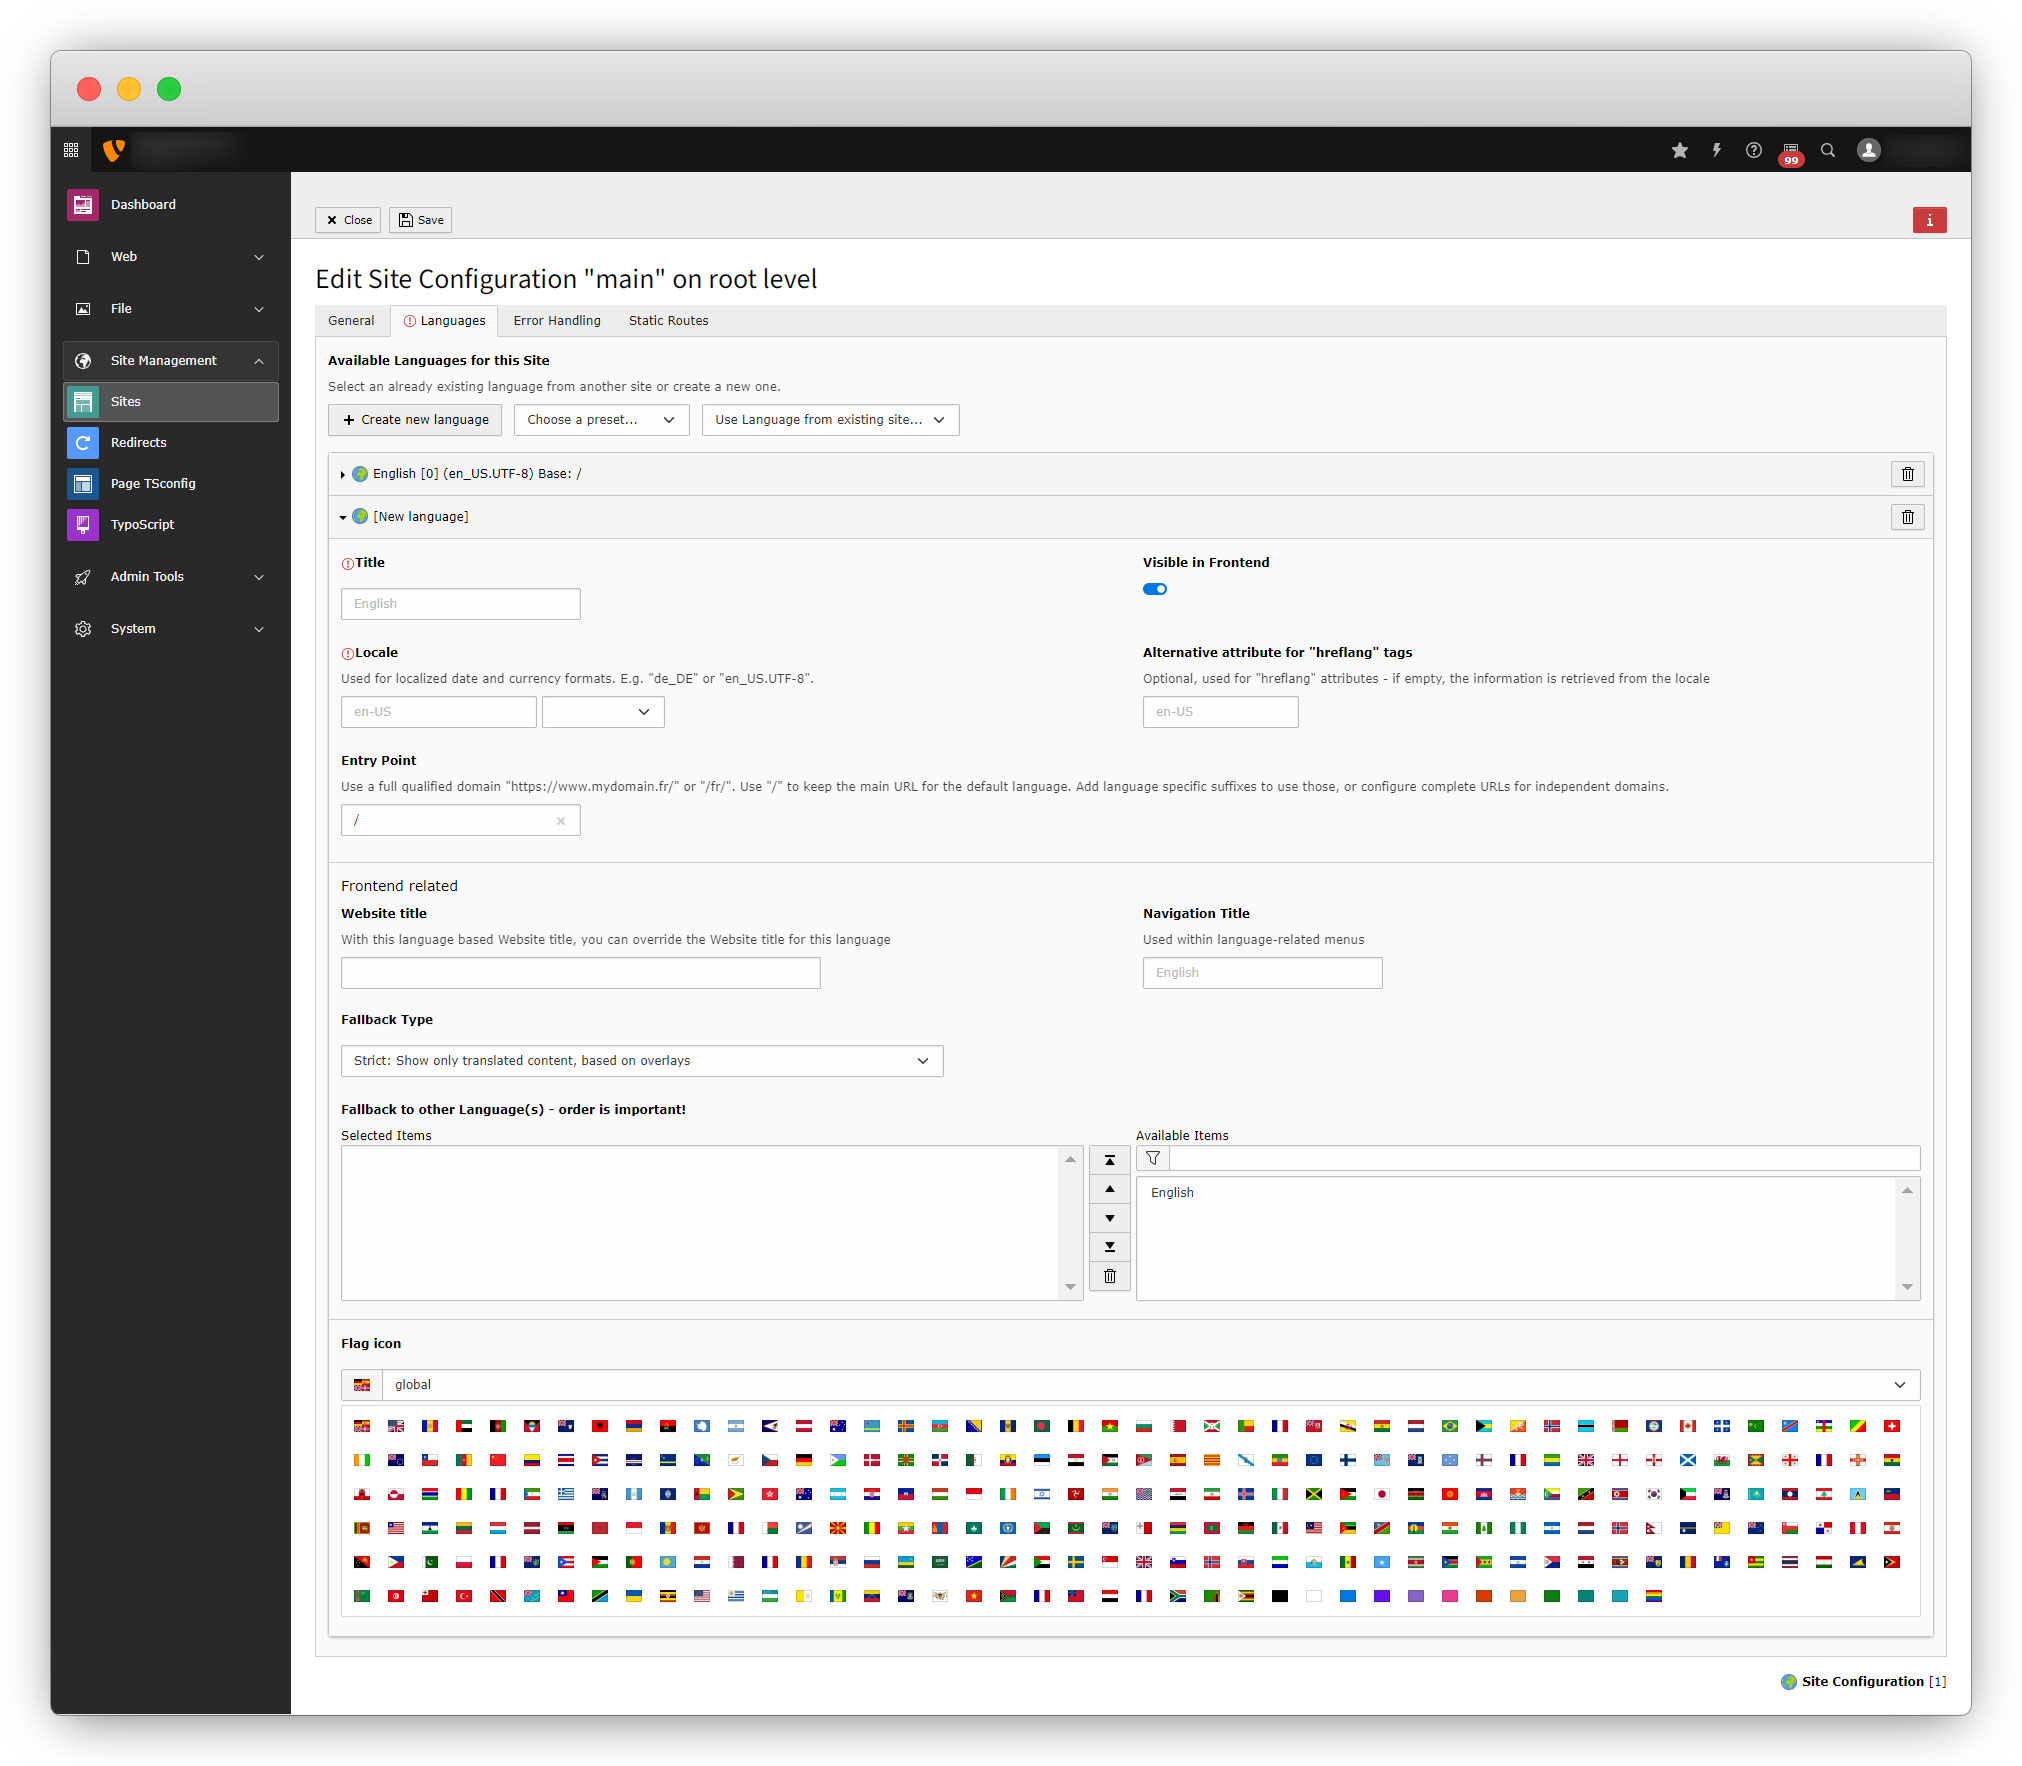
3. By clicking on the “Create new language” button to add a new language, you will get a form to set the configs for the new language as seen in the screenshot below:
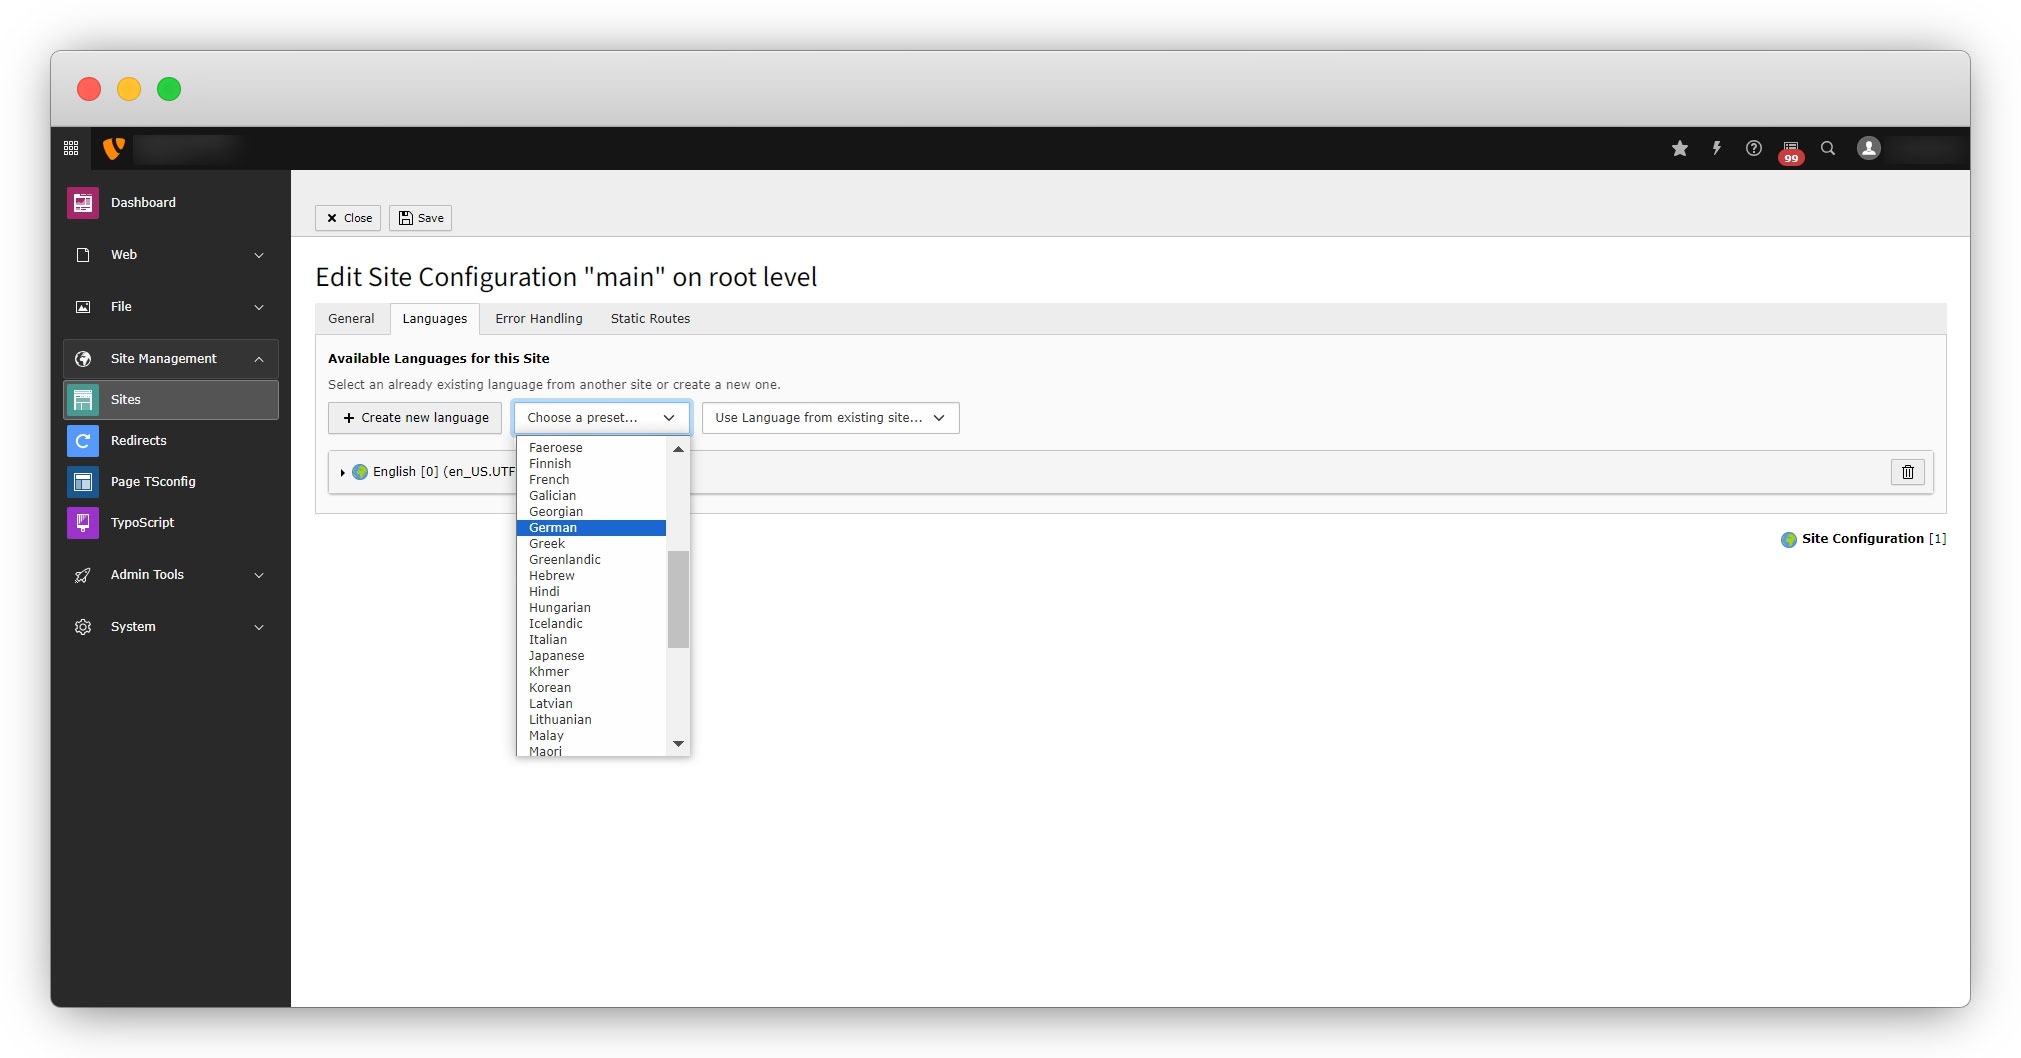
4. And if you click on the “Choose a preset..” button you will get options to select the language, and after selecting the language, you will get a prefilled form with the configs of that language. You can see in the screenshots below:
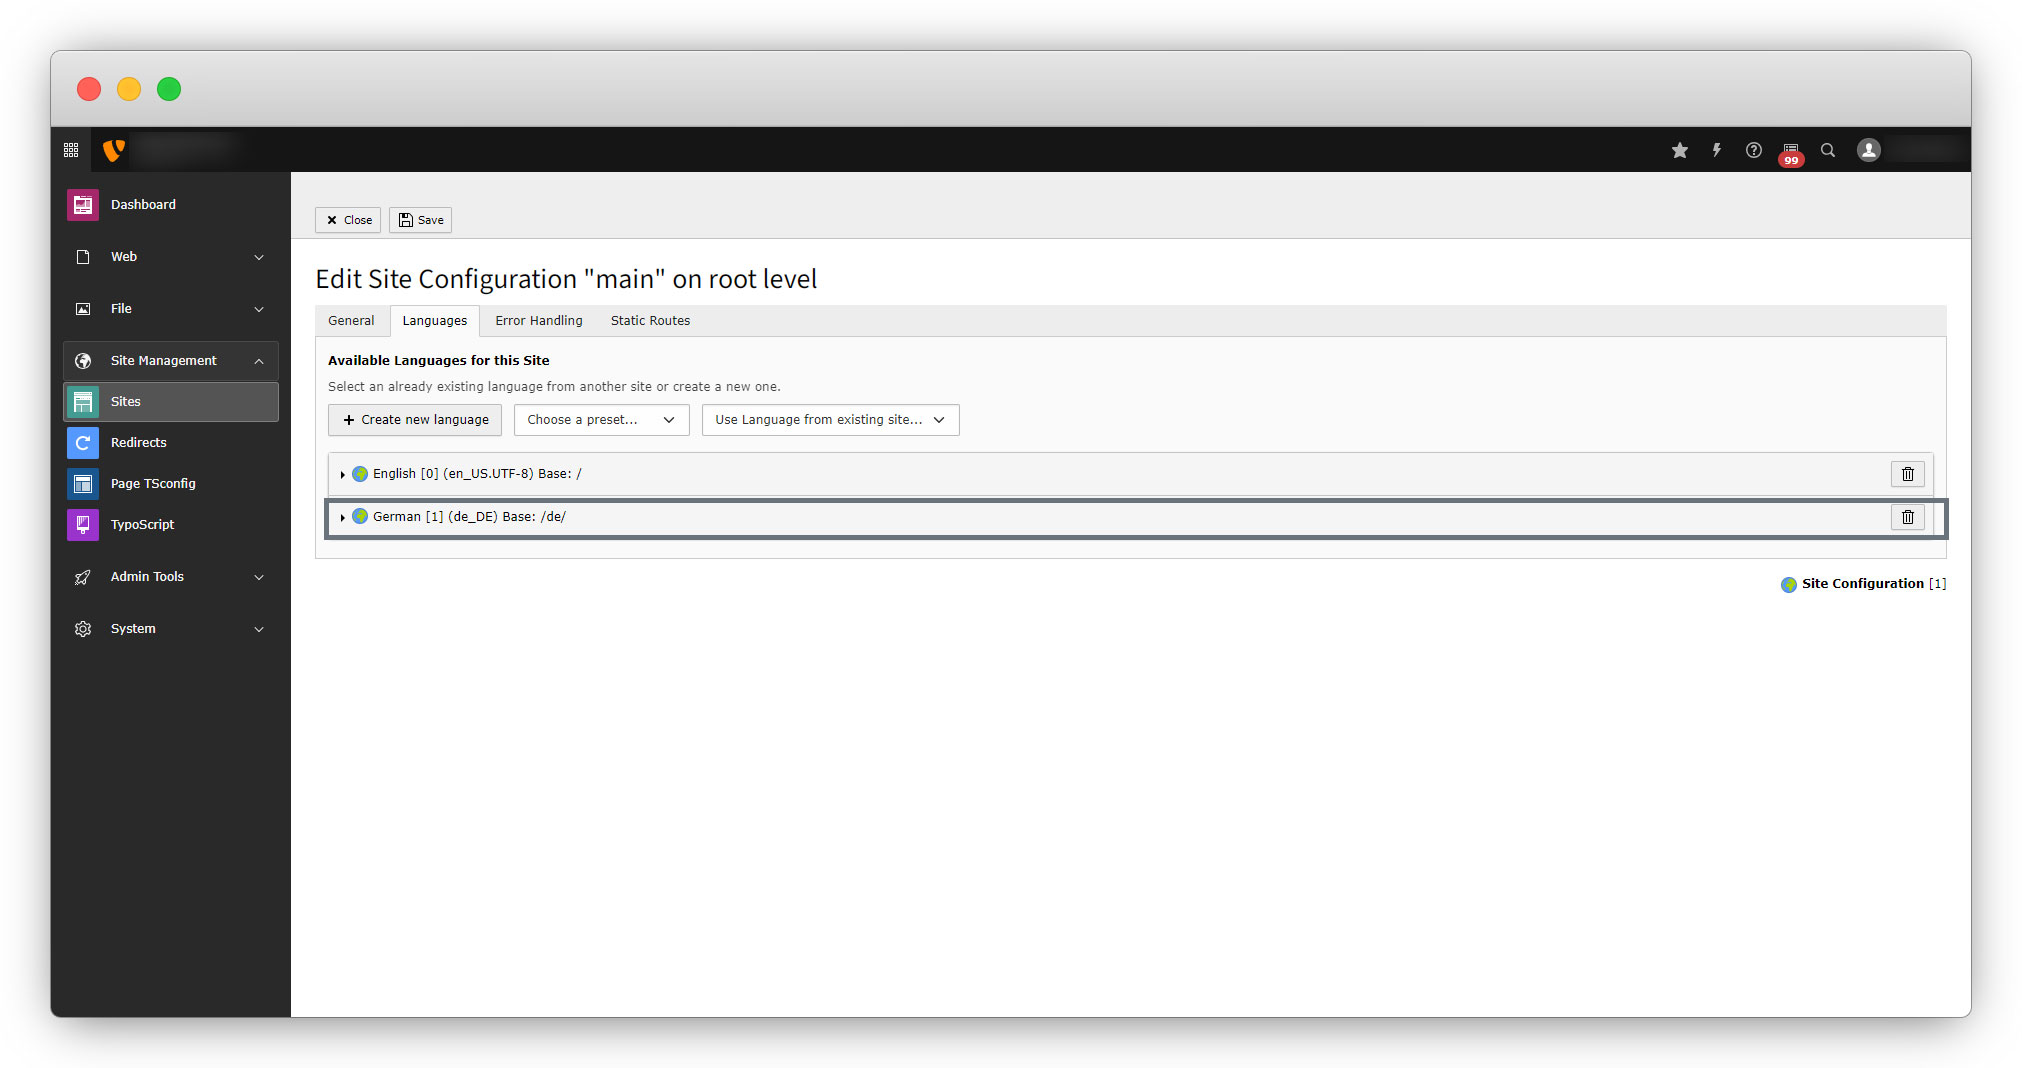
5. After saving the language you will see the language in the list as seen in the screenshot below
6. To select the language option in front-end, let’s create the language menu.
Add the language menu
1. To switch the language in front-end and get the front-end content with the selected language, it needs to create the language menu. Here is the reference link for the language menu – https://docs.typo3.org/m/typo3/guide-frontendlocalization/main/en-us/LanguageMenu/Index.html#language-selection-menu
2. To add the language menu, write the typoscript. Update the existing setup.typoscript file of the extension “Employee”.
3. The file path is employeeConfigurationTypoScriptsetup.typoscript
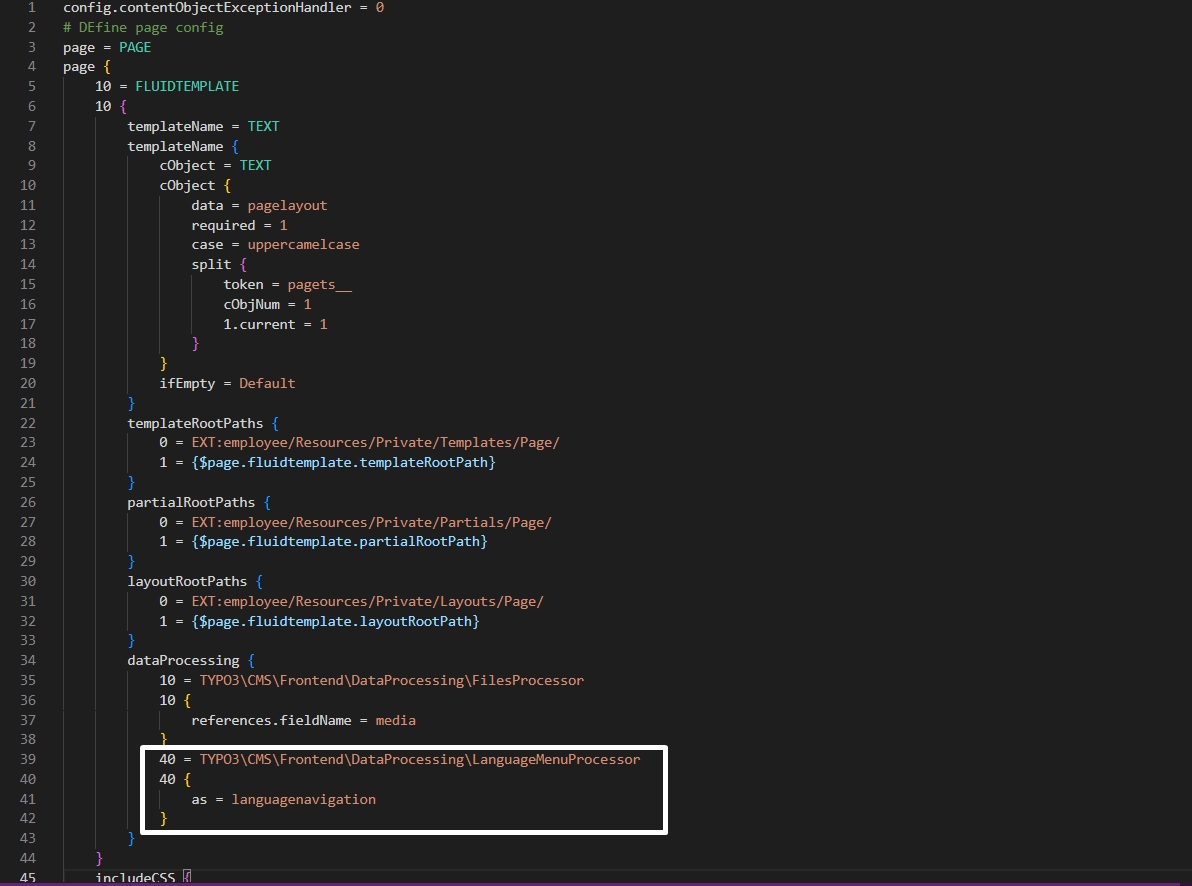
4. Add the given code below to the file setup.typoscript under “dataProcessing”
40 = TYPO3CMSFrontendDataProcessingLanguageMenuProcessor
40 {
    as = languagenavigation
}
5. Below is the screenshot of the employeeConfigurationTypoScriptsetup.typoscript file after adding the above code under “dataProcessing”.
6. After adding the code to the setup.typoscript, now need to call the “typoscript languagenavigation object” into the template file.
7. Here please note that we want to add the language menu for all the pages, so we have to add the language menu to the extension’s page template file – employeeResourcesPrivateTemplatesPageDefault.html
8. Add the below code or replace the existing code with the code given below to the file – employeeResourcesPrivateTemplatesPageDefault.html
<f:layout name="Default" />
<f:section name="Main">
  <f:if condition="{languagenavigation}">
    <ul id="language_menu">
        <f:for each="{languagenavigation}" as="item">
            <li>
                <f:if condition="{item.available}">
                    <f:then>
                        <a href="{item.link}" hreflang="{item.hreflang}" title="{item.title}">
                            <span>{item.navigationTitle}</span>
                        </a>
                    </f:then>
                    <f:else>
                        <span>{item.navigationTitle}</span>
                    </f:else>
                </f:if>
            </li>
        </f:for>
    </ul>
</f:if>
  <f:cObject typoscriptObjectPath="lib.dynamicContent" data="{colPos: 0}" />
</f:section>
9. After adding the above code Flush TYPO3 and PHP Cache and after reloading the job page you will see the language menu there as you can see in the screenshot below:
10. As you can see in the above screenshot, the language menu is rendering but the German language is still not enabled, if you try to switch the language, you will not be able to translate the page into the German language.
11. To enable the language now, it is required to add the multi-language pages. Let’s see how to add multi-language pages.
Add multi-language pages
Follow the given steps below:
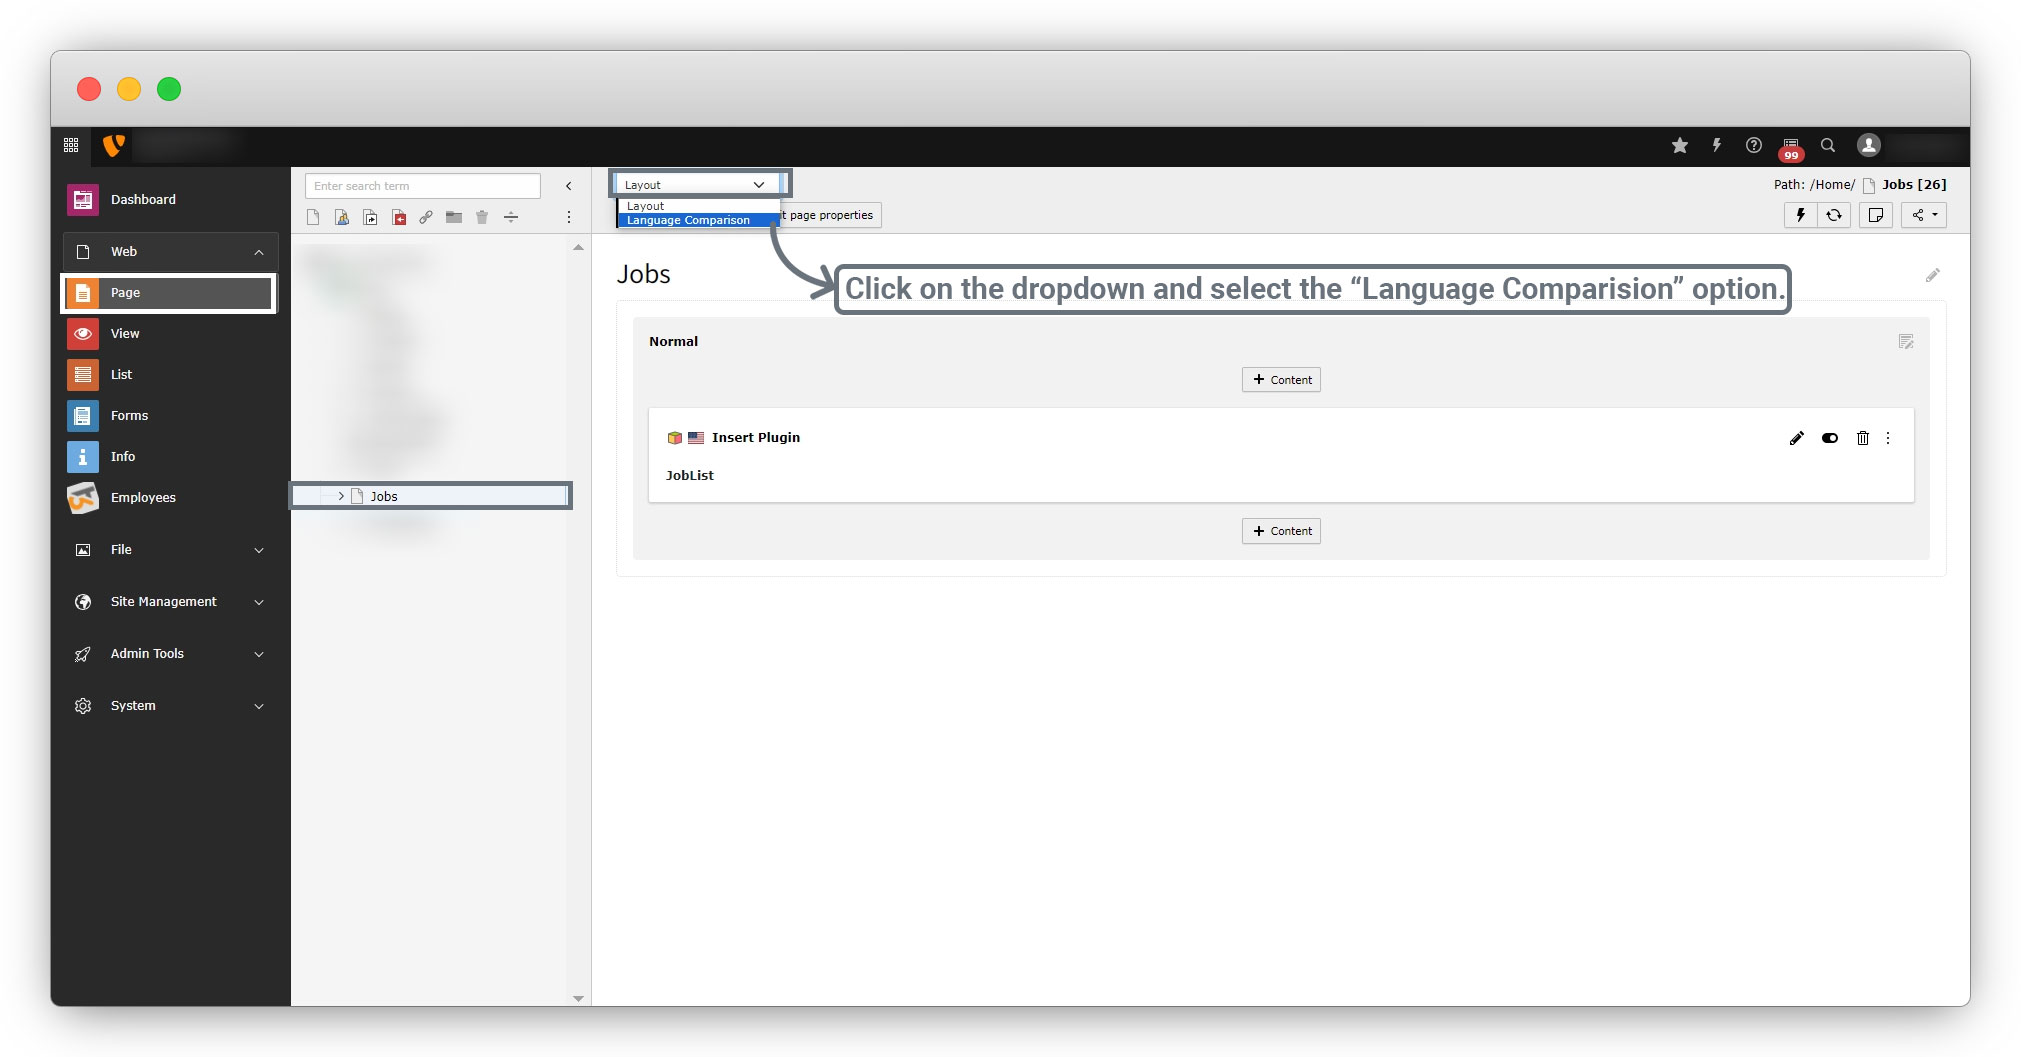
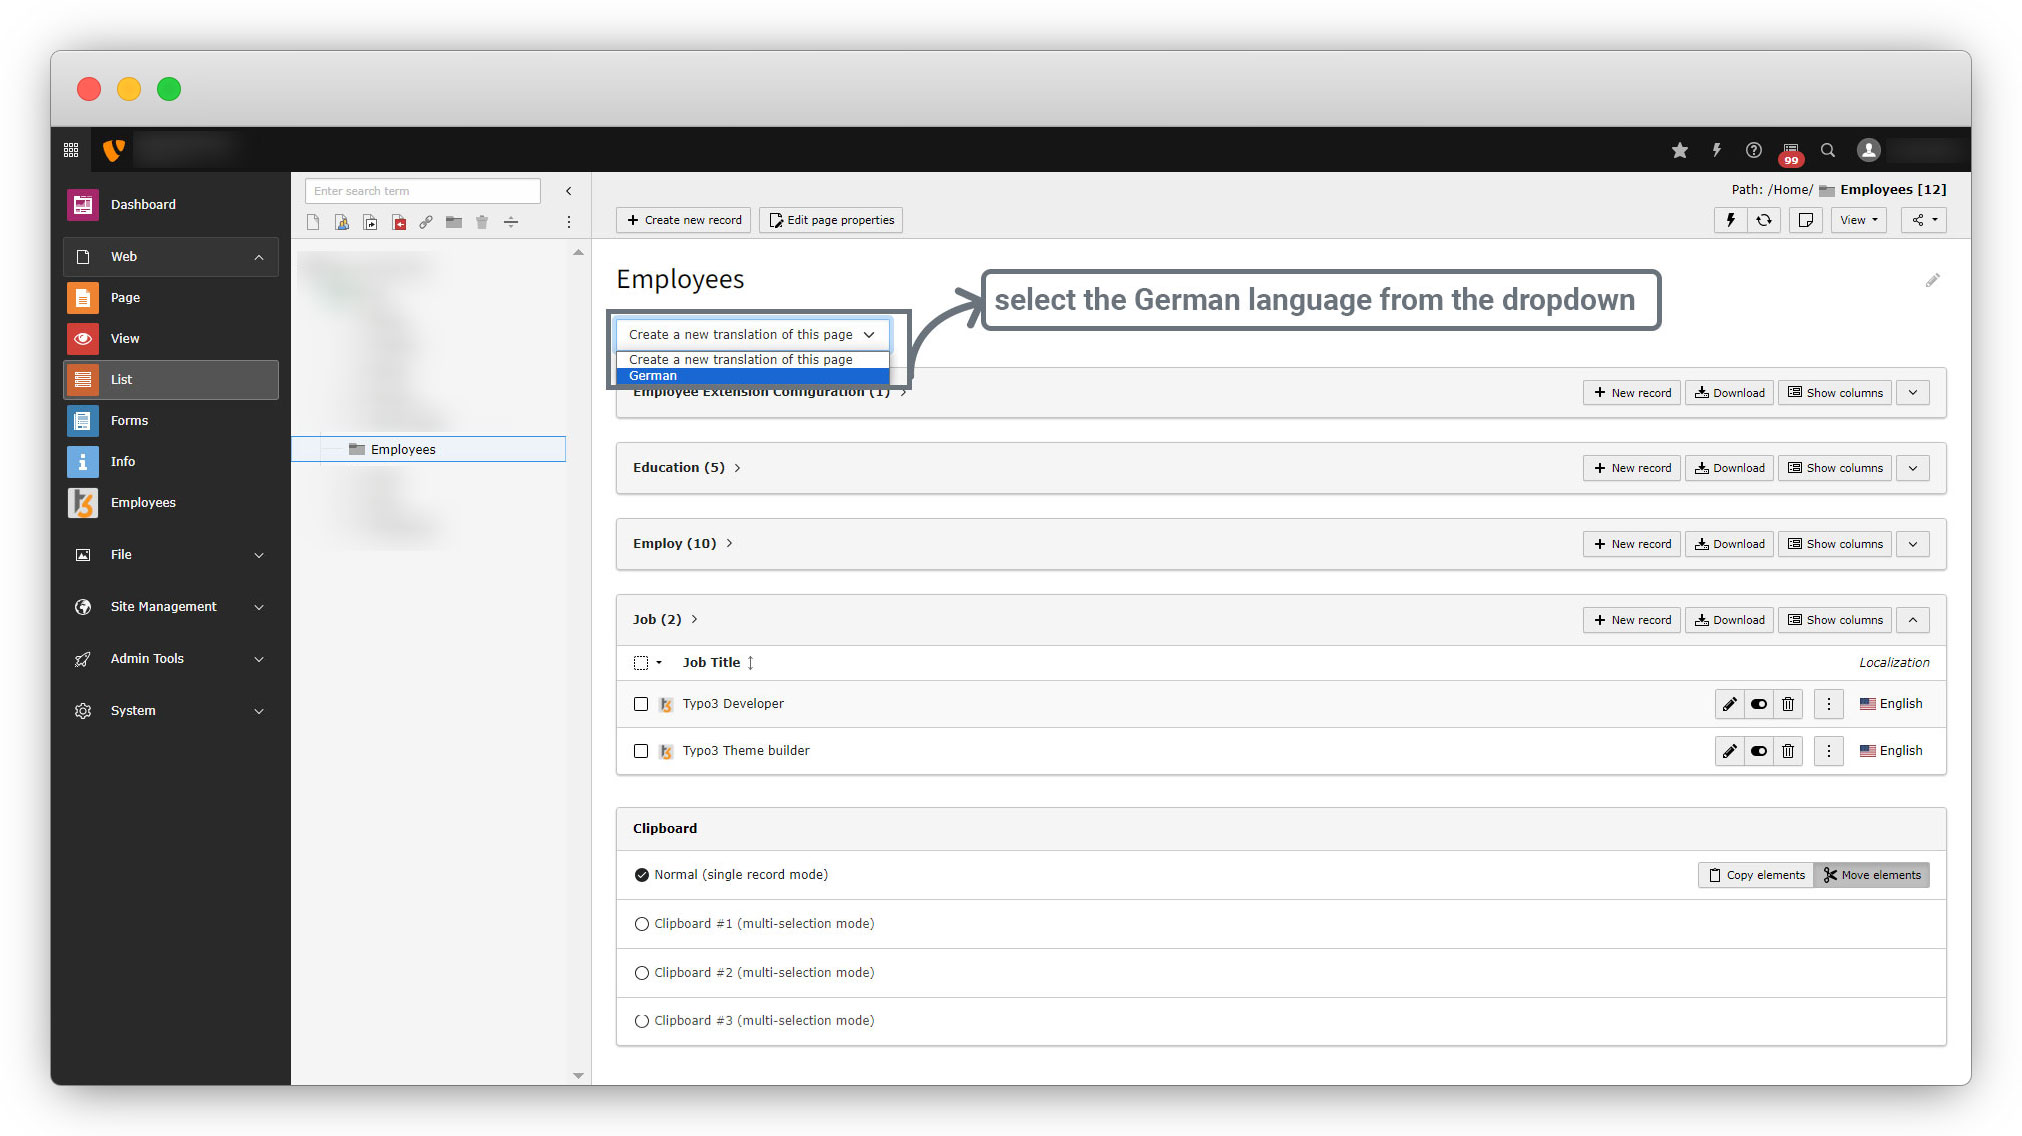
1. Go to the Page and select the page you want to translate, here we want to translate the Jobs page. Click on the page you want to translate, then go to the dropdown at the top-left and select “Language Comparision” as you can see in the screenshot below:
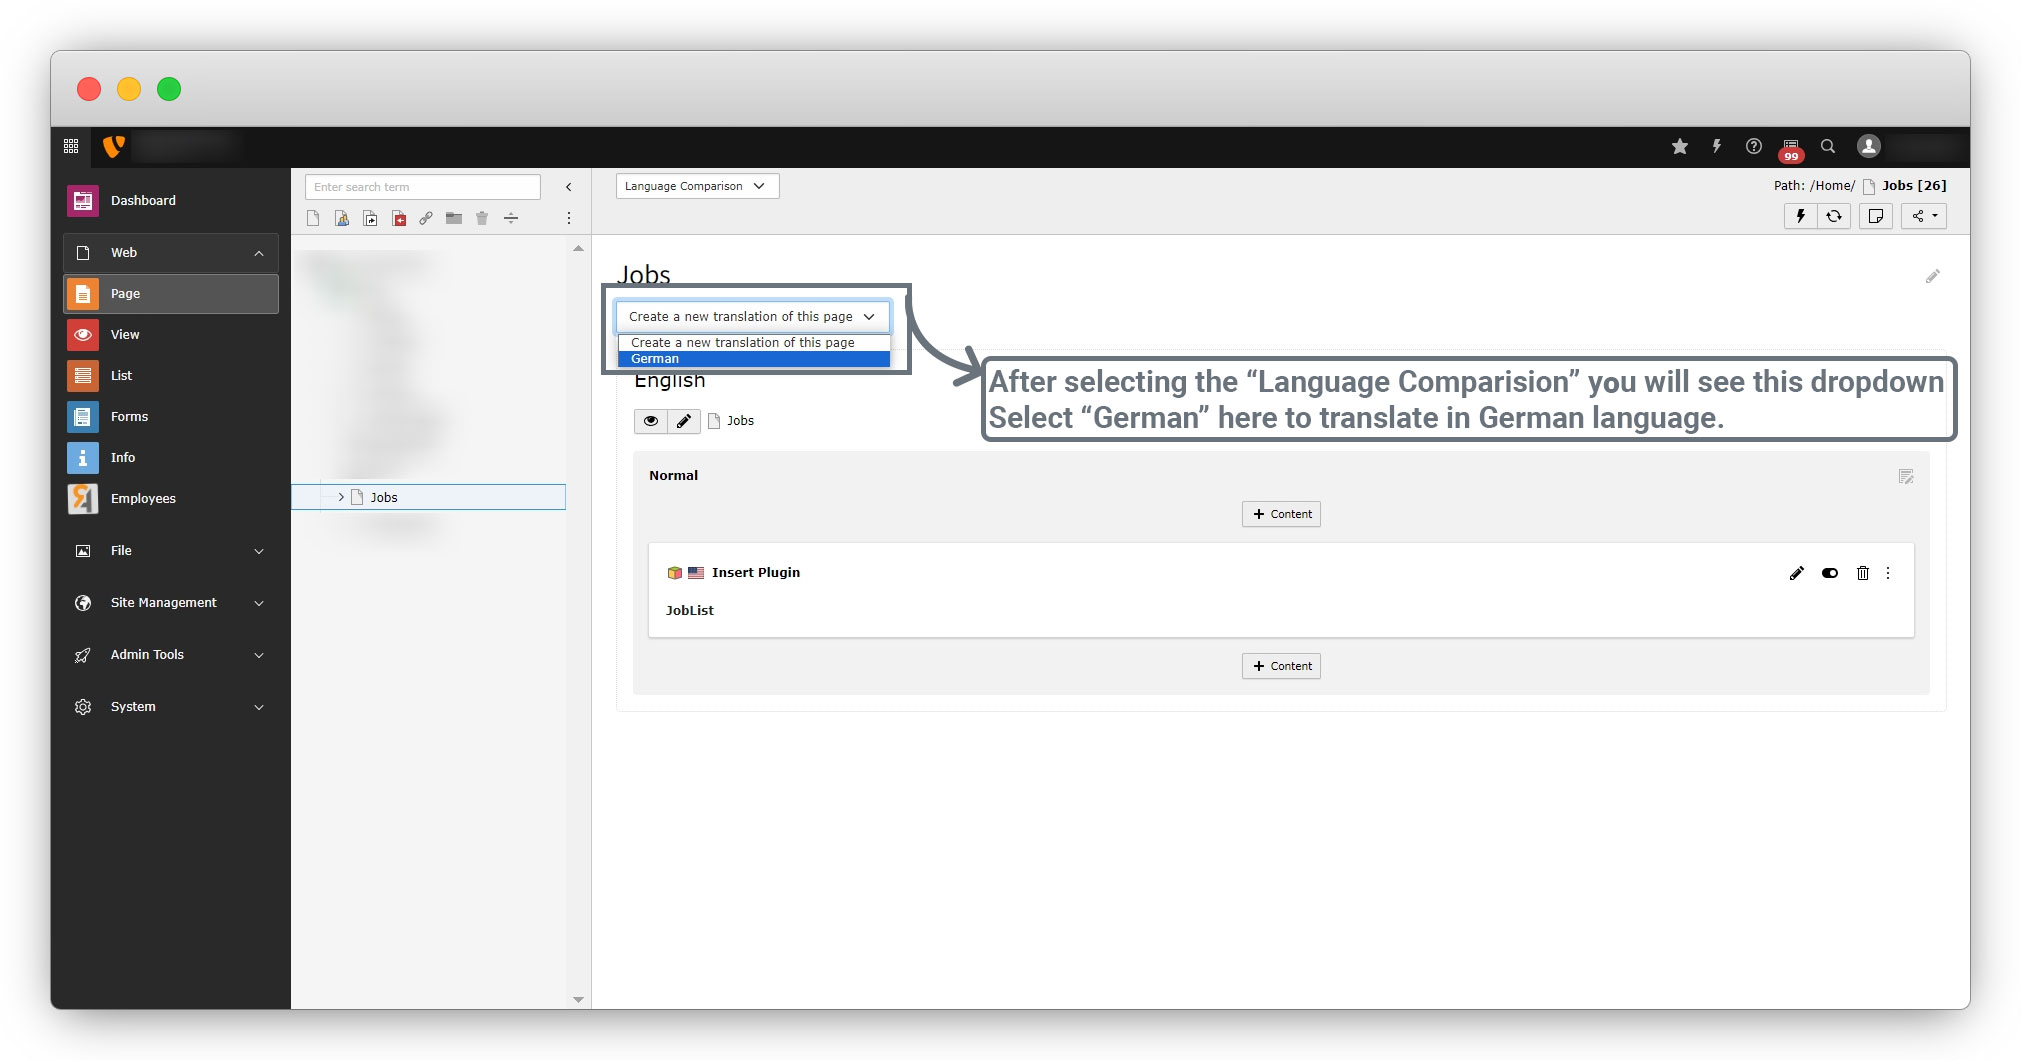
2. After selecting “Language Comparision” you will see a dropdown as seen in the screenshot below, select the language you want to translate, from that dropdown.
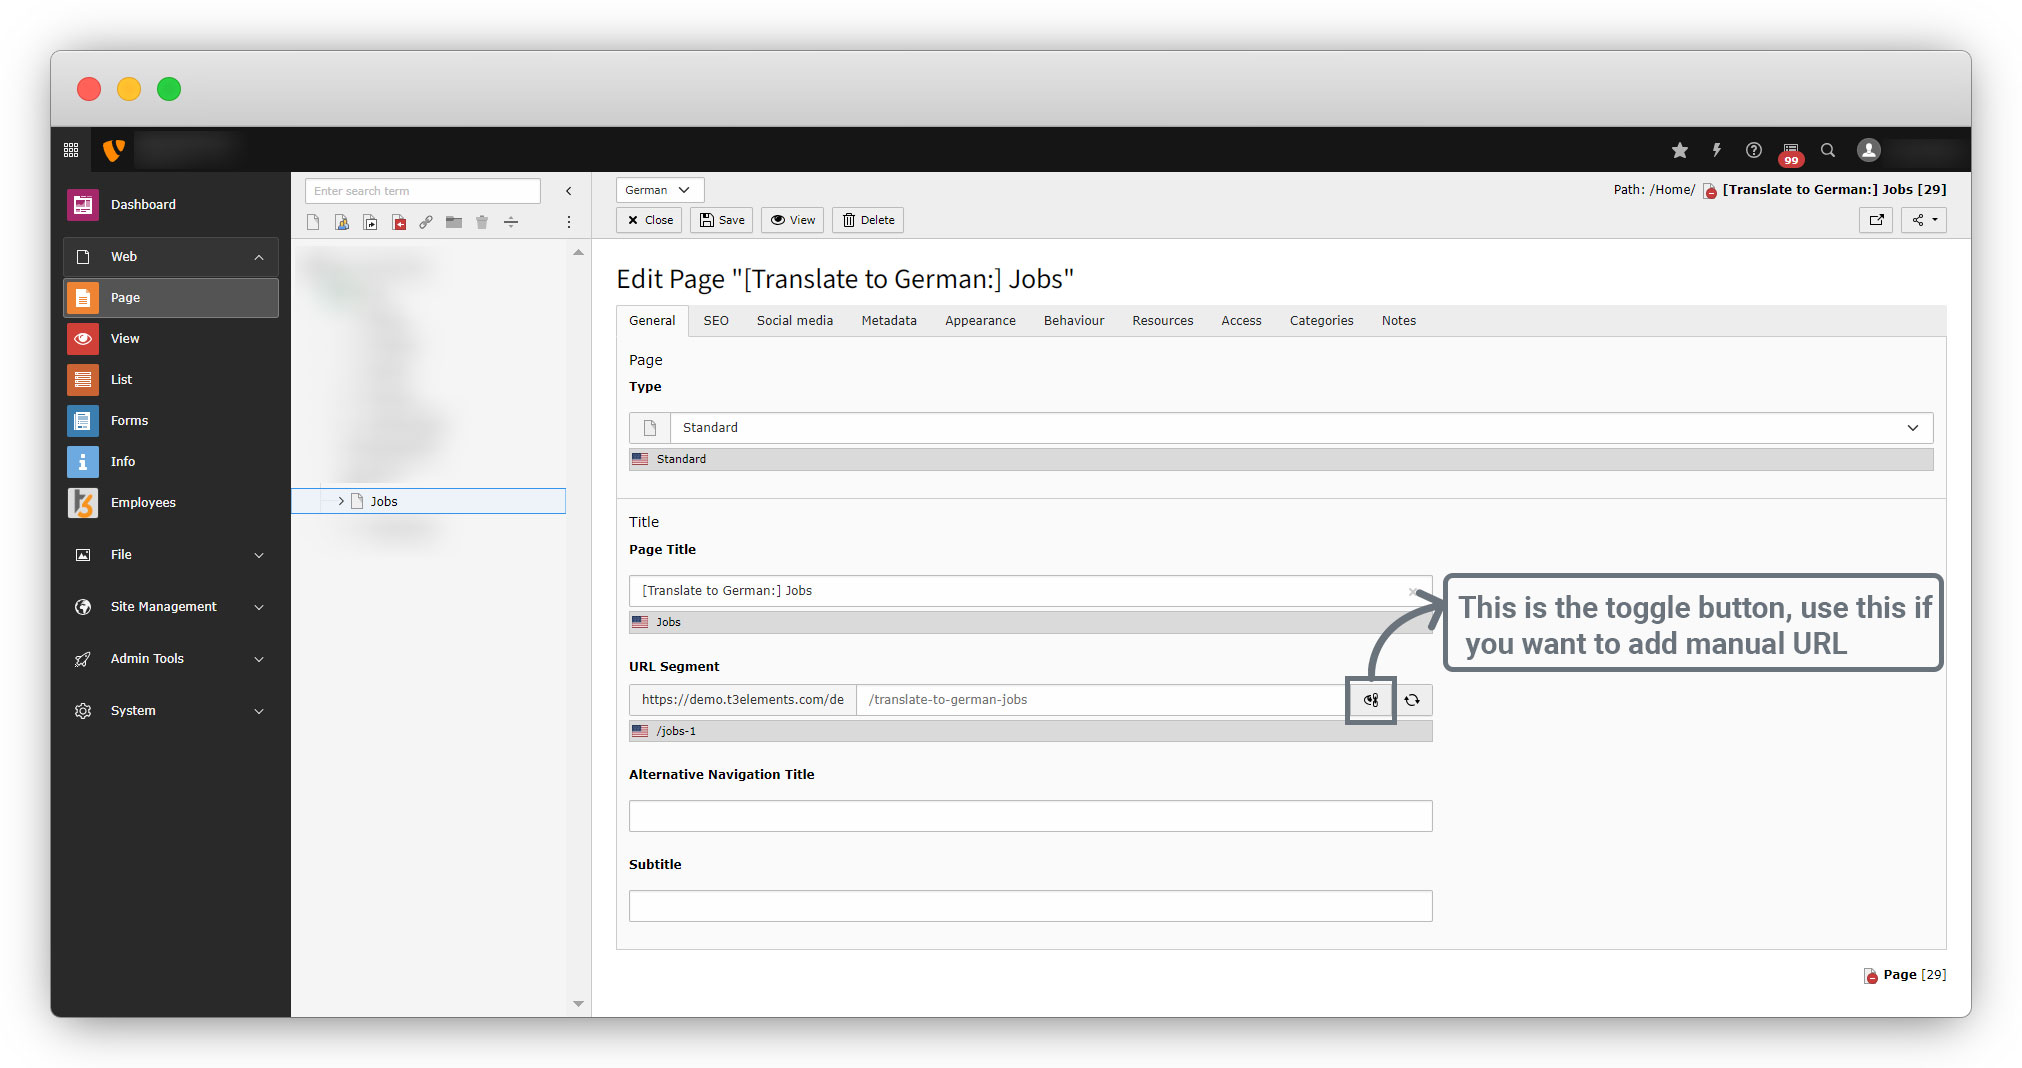
3. As you select “German”, you will be redirected to the below page:
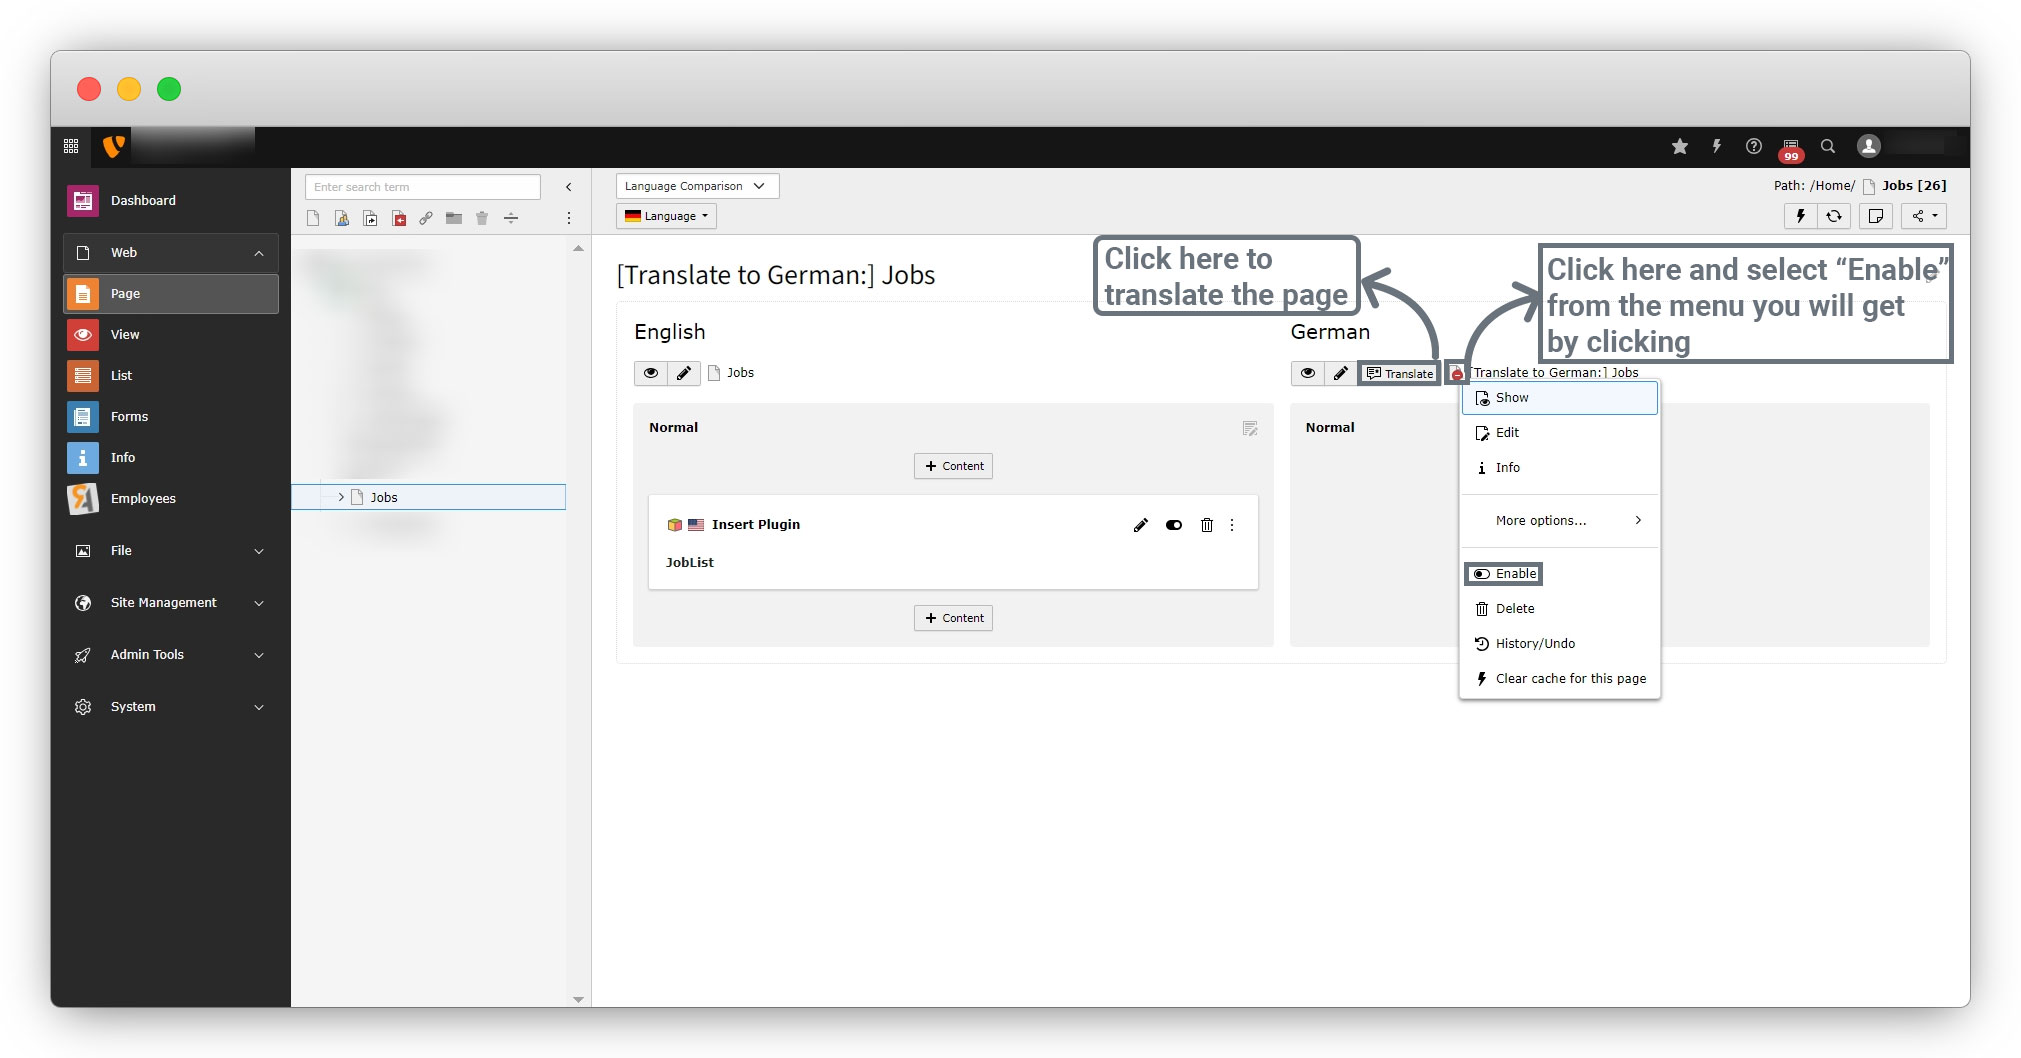
4. Save the page and you will see the option to translate the page as you can see below, if your German page is disabled then enable it and click on the translate button to translate the page into German.
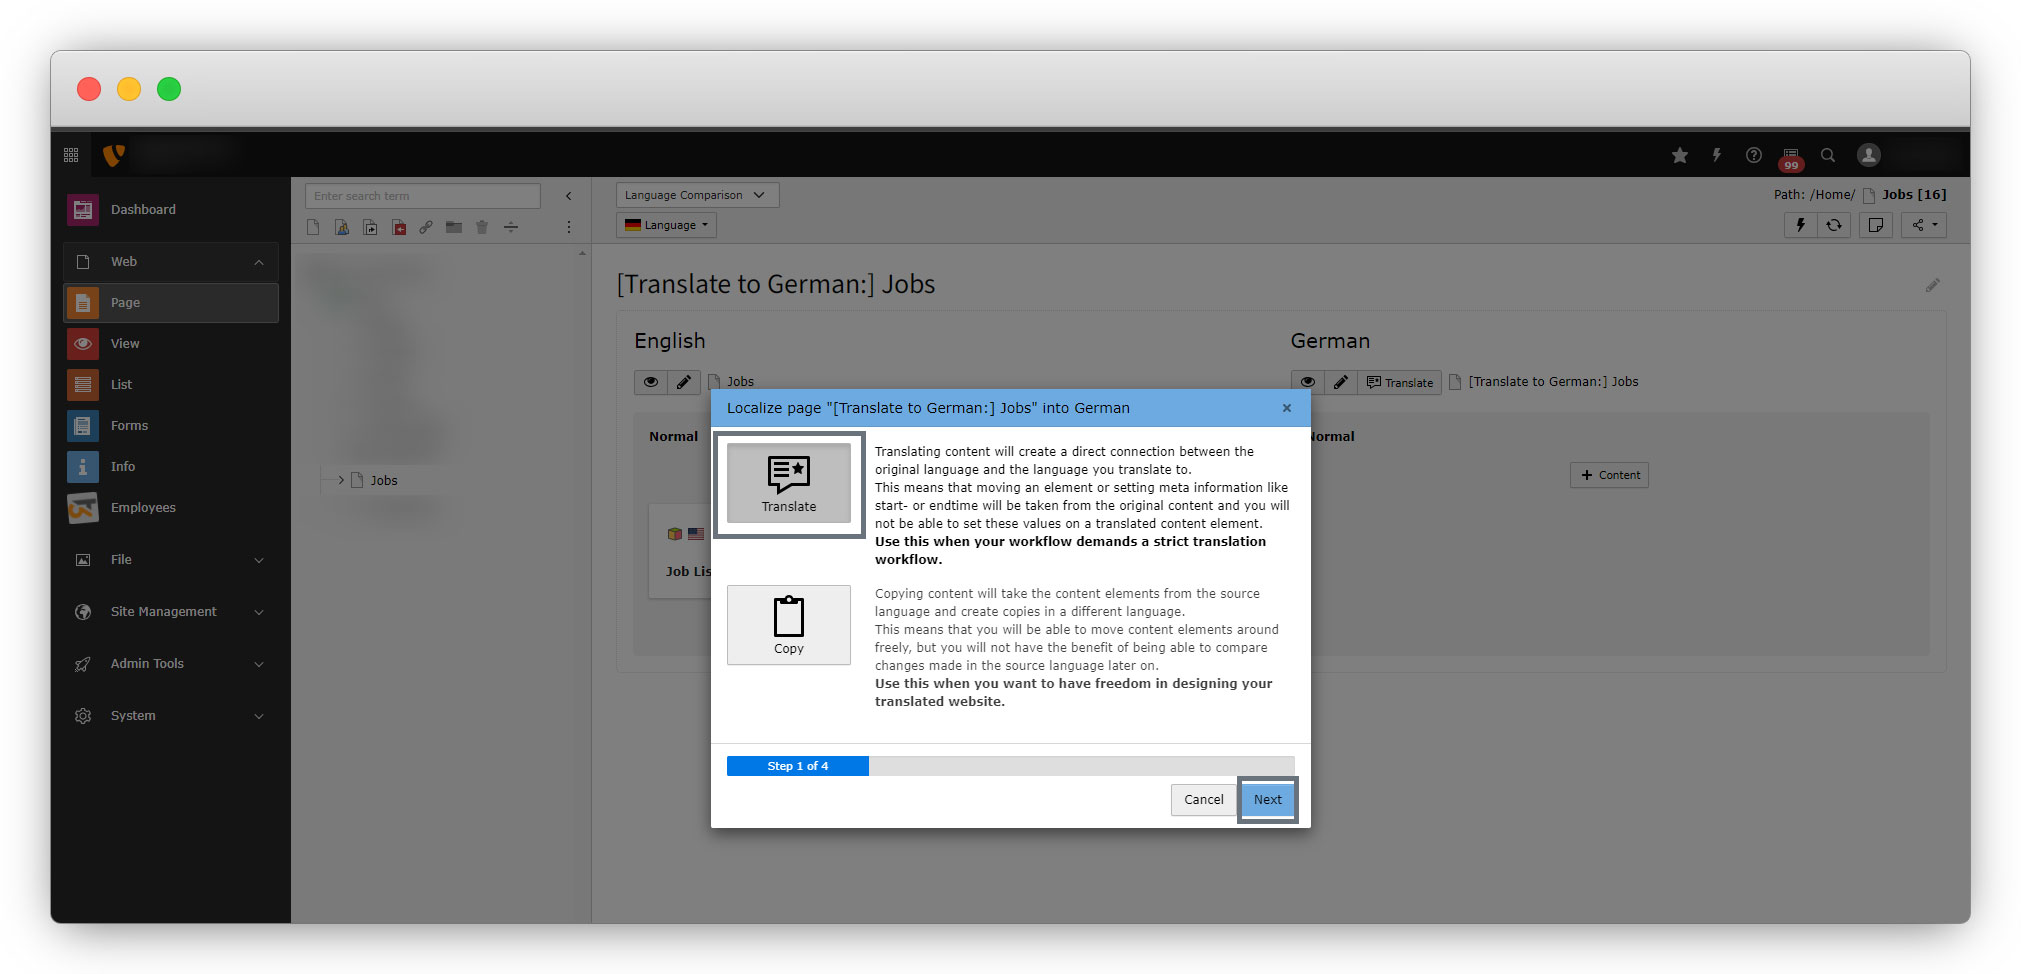
5. When you click on the “Translate” button, you will see 2 options i)Translate and ii) Copy
- Translate: Use this when your workflow demands a strict translation workflow.
- Copy: Use this when you want freedom in designing to your translated website.
6. Here we are using the “Translate” option by clicking on it and then clicking on the “Next” button.
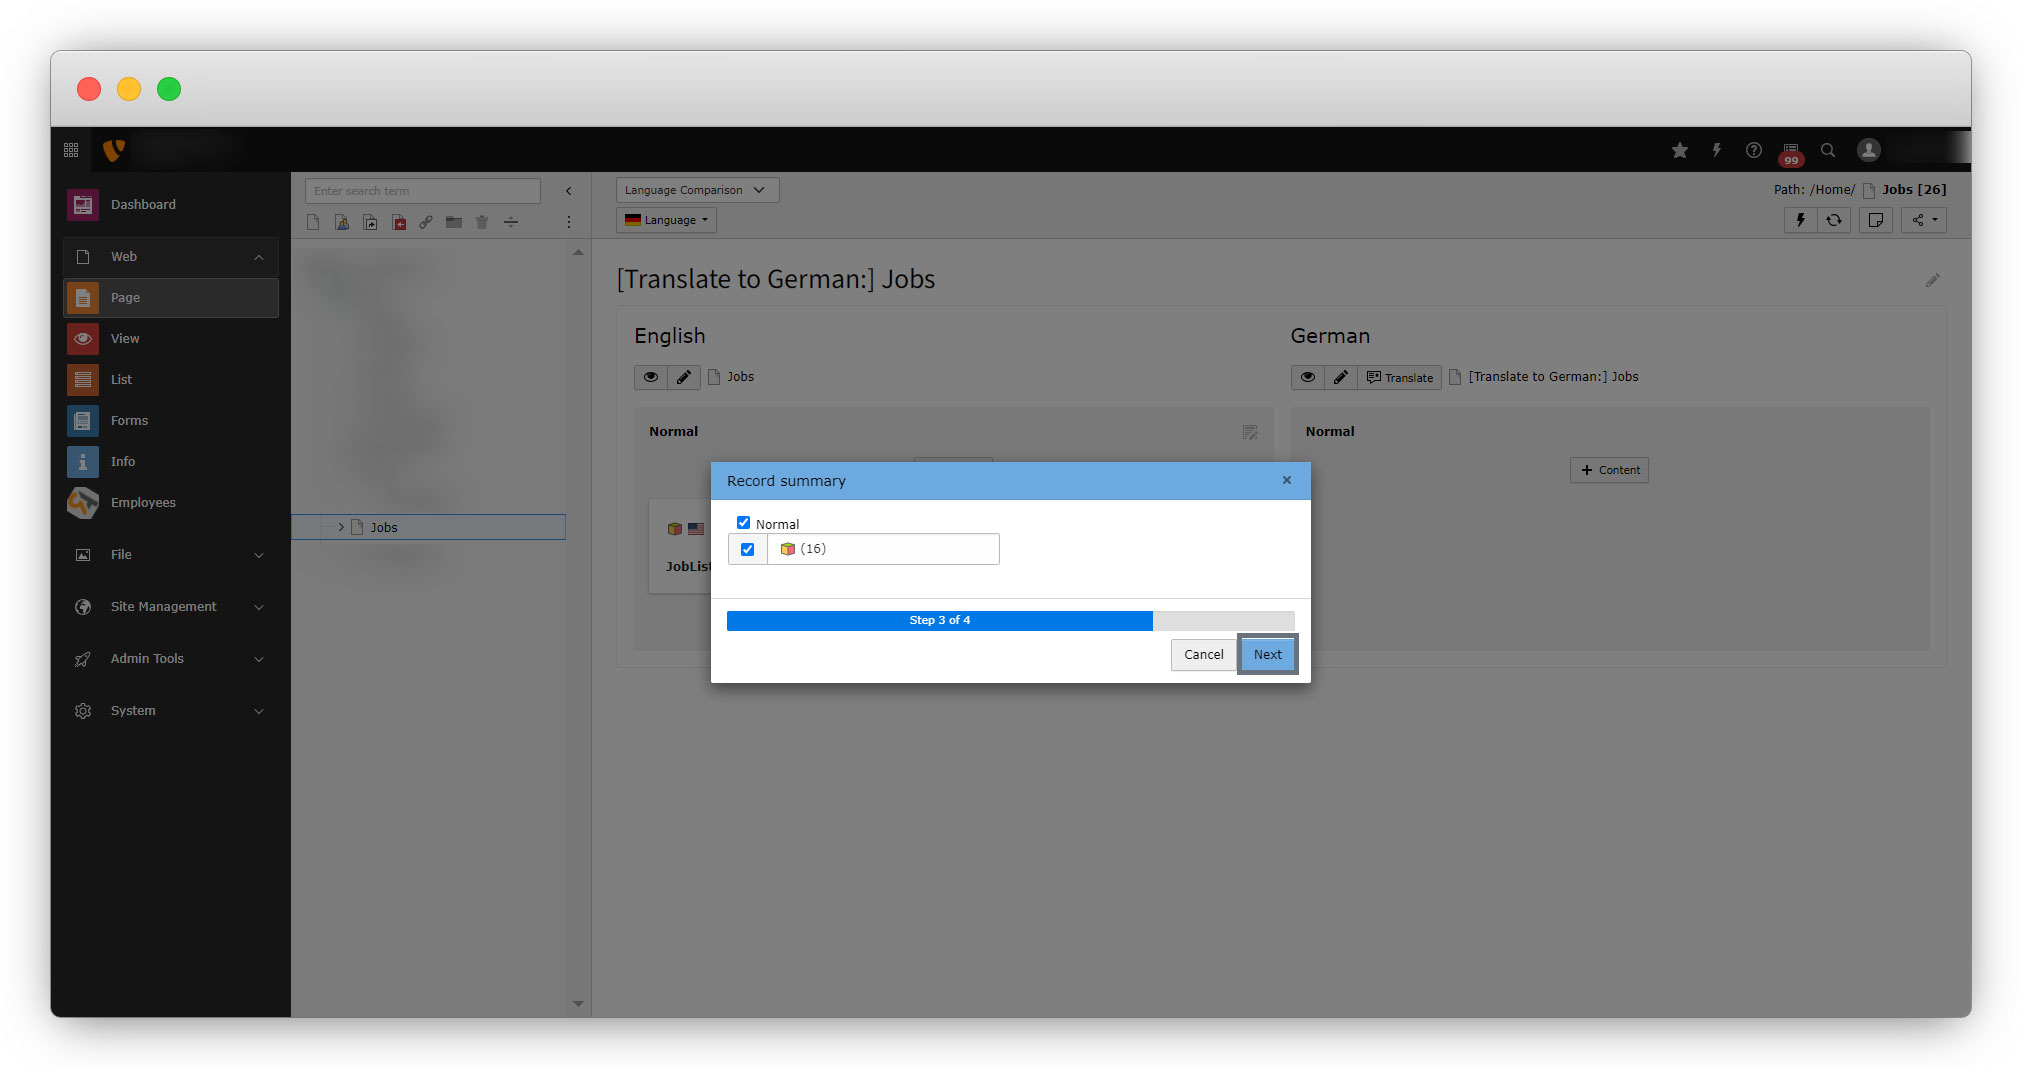
7. Then select the content that needs to be translated and click on the “Next” button.
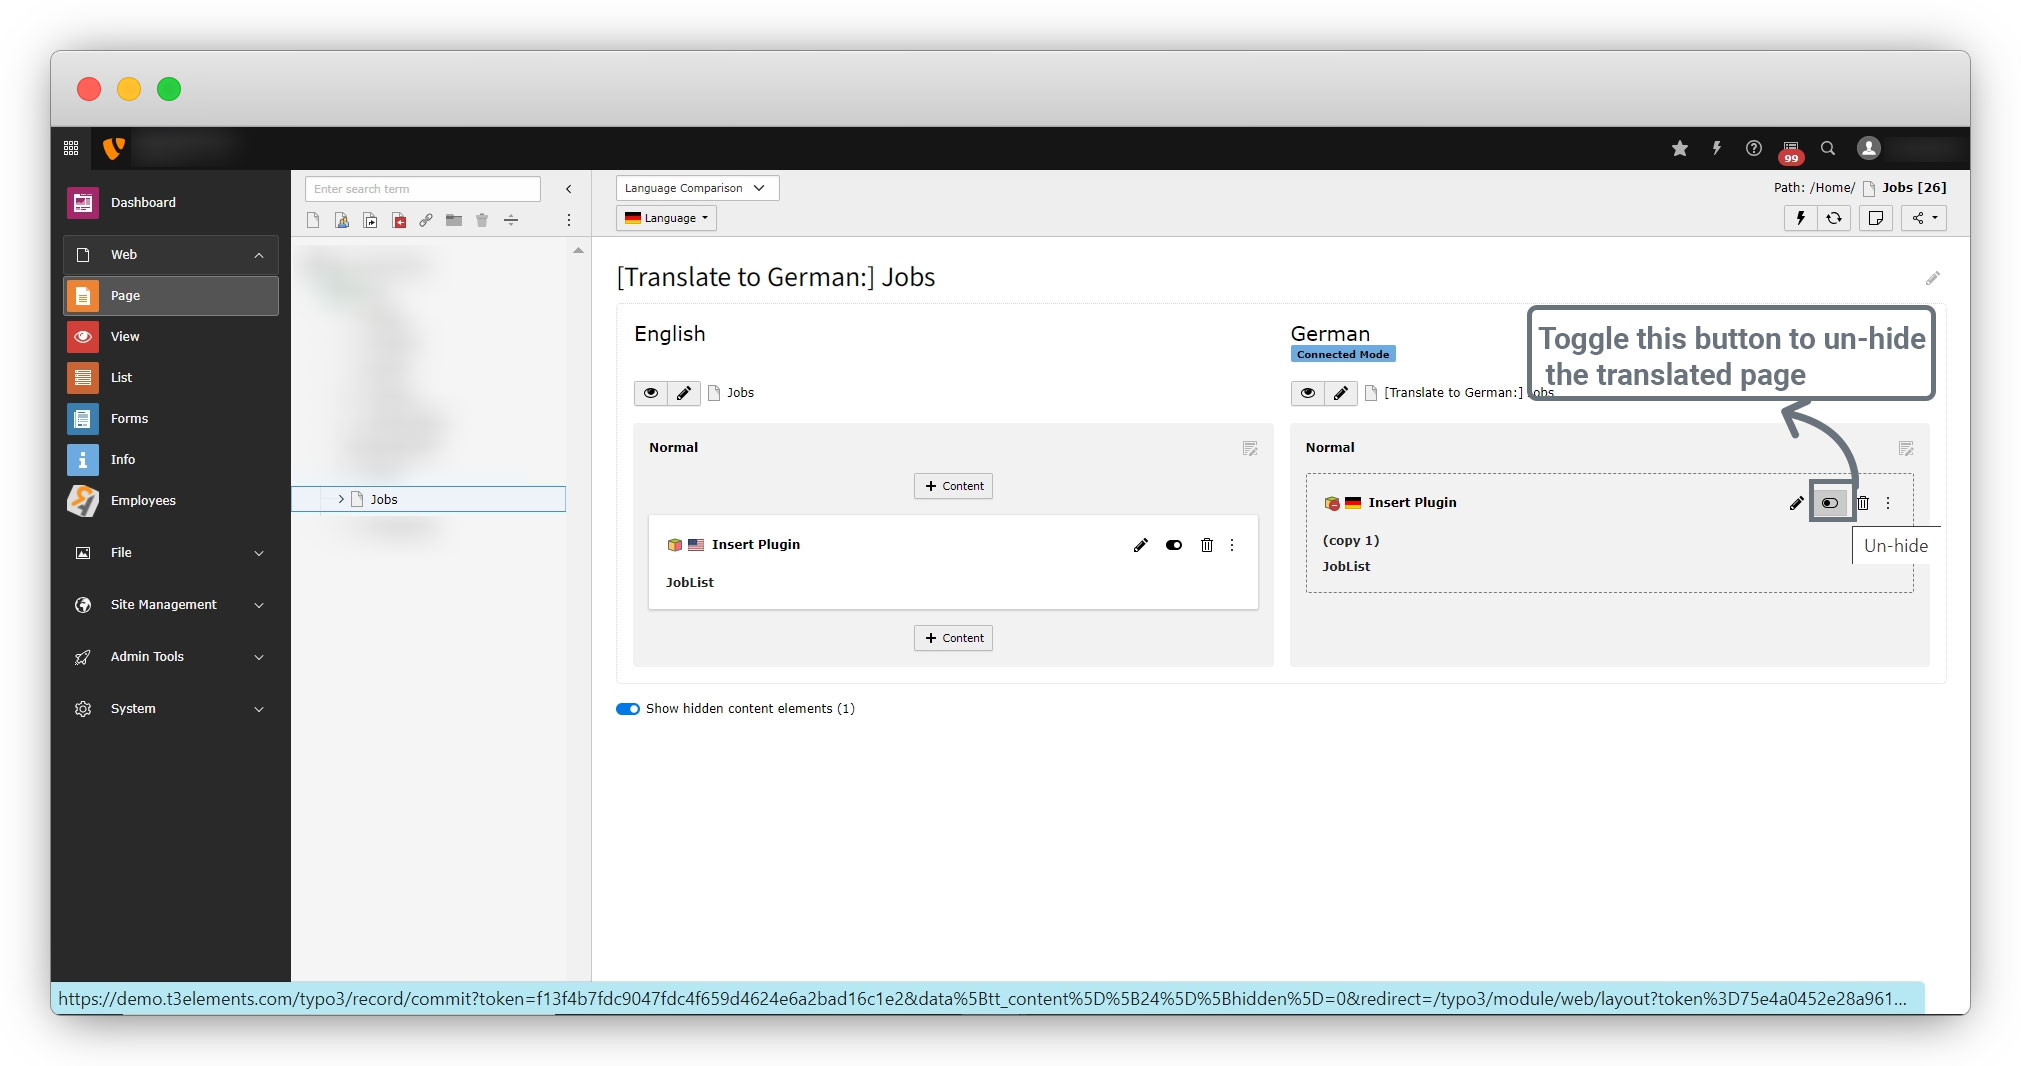
8. And you will see the translated page now, but it will be the hidden page. Toggle the un-hide button to un-hide the translated page.
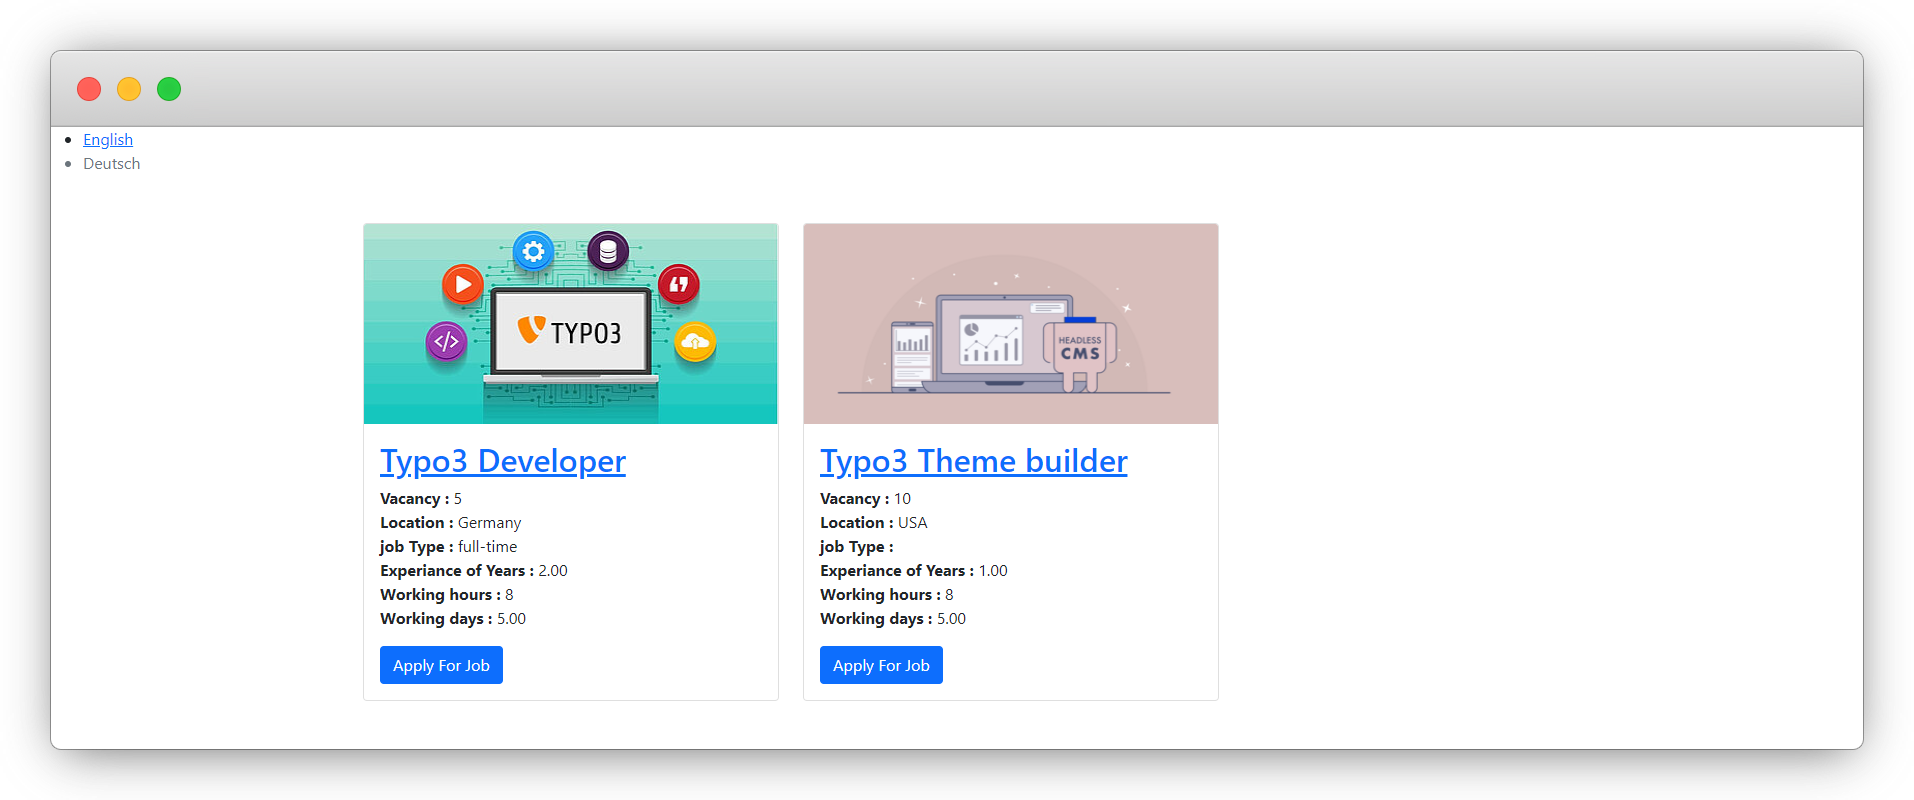
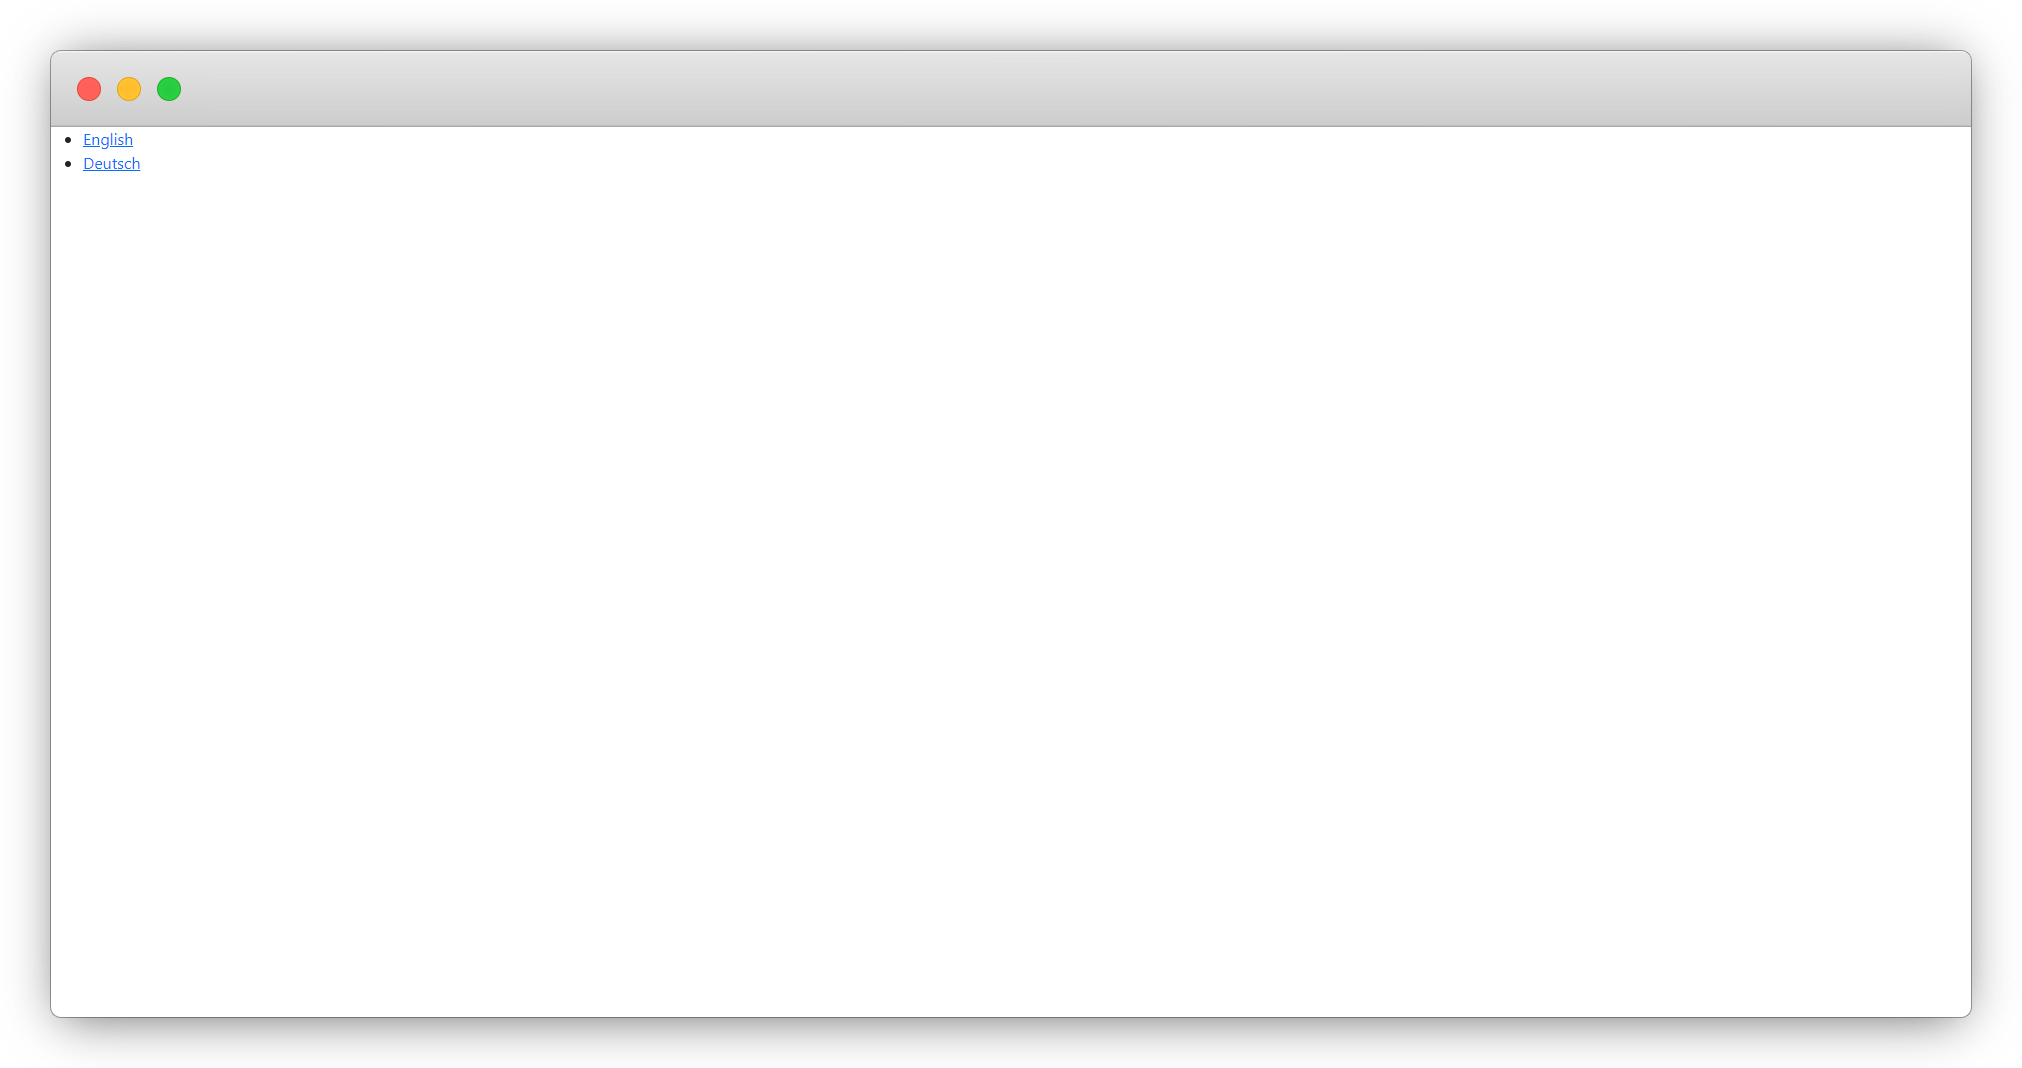
9. Then flush the cache, open the jobs page in front-end, and try to switch the language from the language menu, it will work but when you switch to the German language there will be no content on the page as seen in the screenshot below, but when you switch to the English language you will see the content on the page, and this happens because we didn’t translate the records of extension to render in the German language.
10. Let’s see how to translate extension records.
How to translate extension record
1. To get the records for the German language in front-end, translate the records from the List module.
2. Go to Web > List and select the folder you have stored your records in, here that folder is “Employees”.
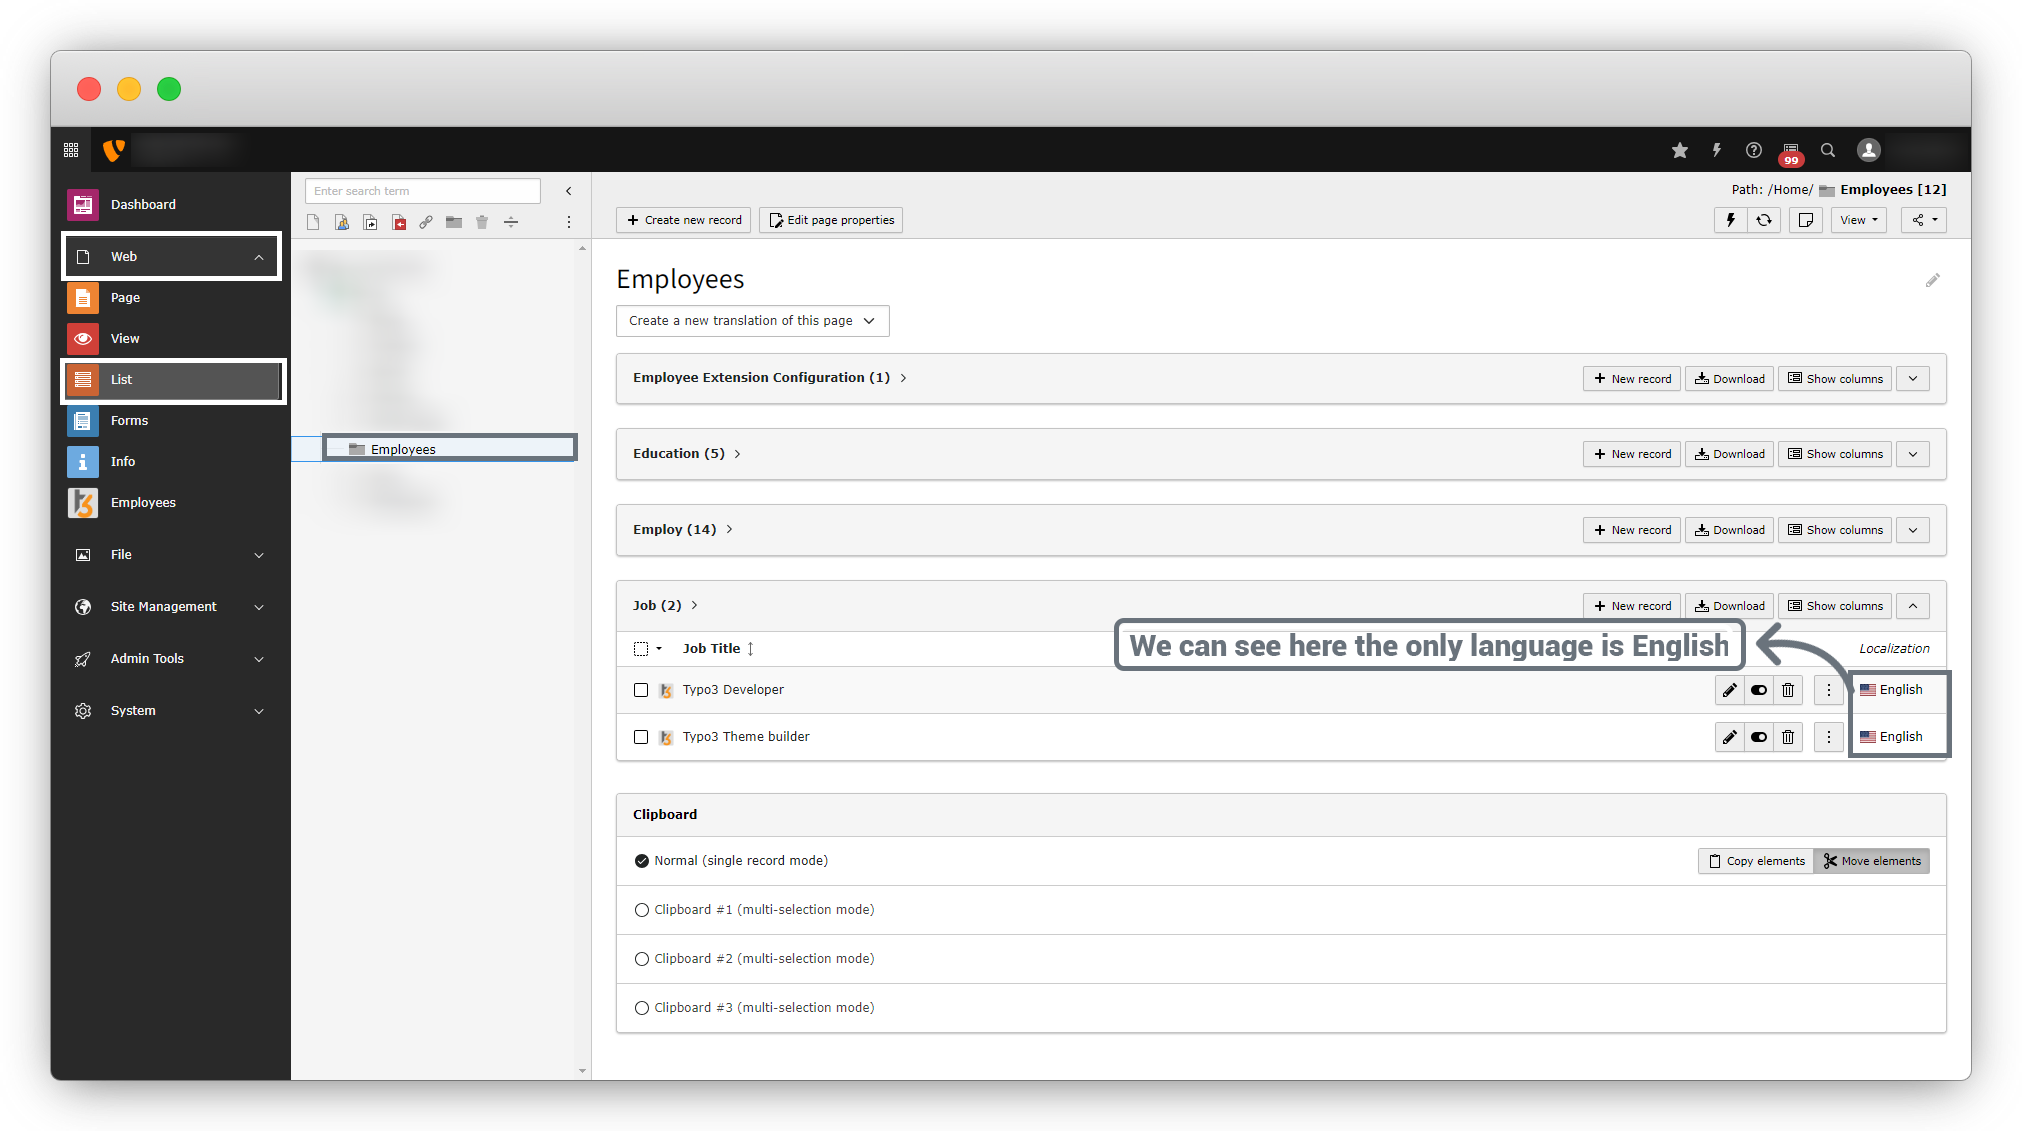
3. Here we don’t have an option to translate the records. Before translating the records, we should translate the folder.
4. To translate the folder do the same process as we did at the time of page translation.
5. Then you will get the options for the German translation, set all the options and save the page.
6. After Saving the translated folder, go to the List module and select the folder of records again and you will see the options to translate the records as seen in the screenshot below.
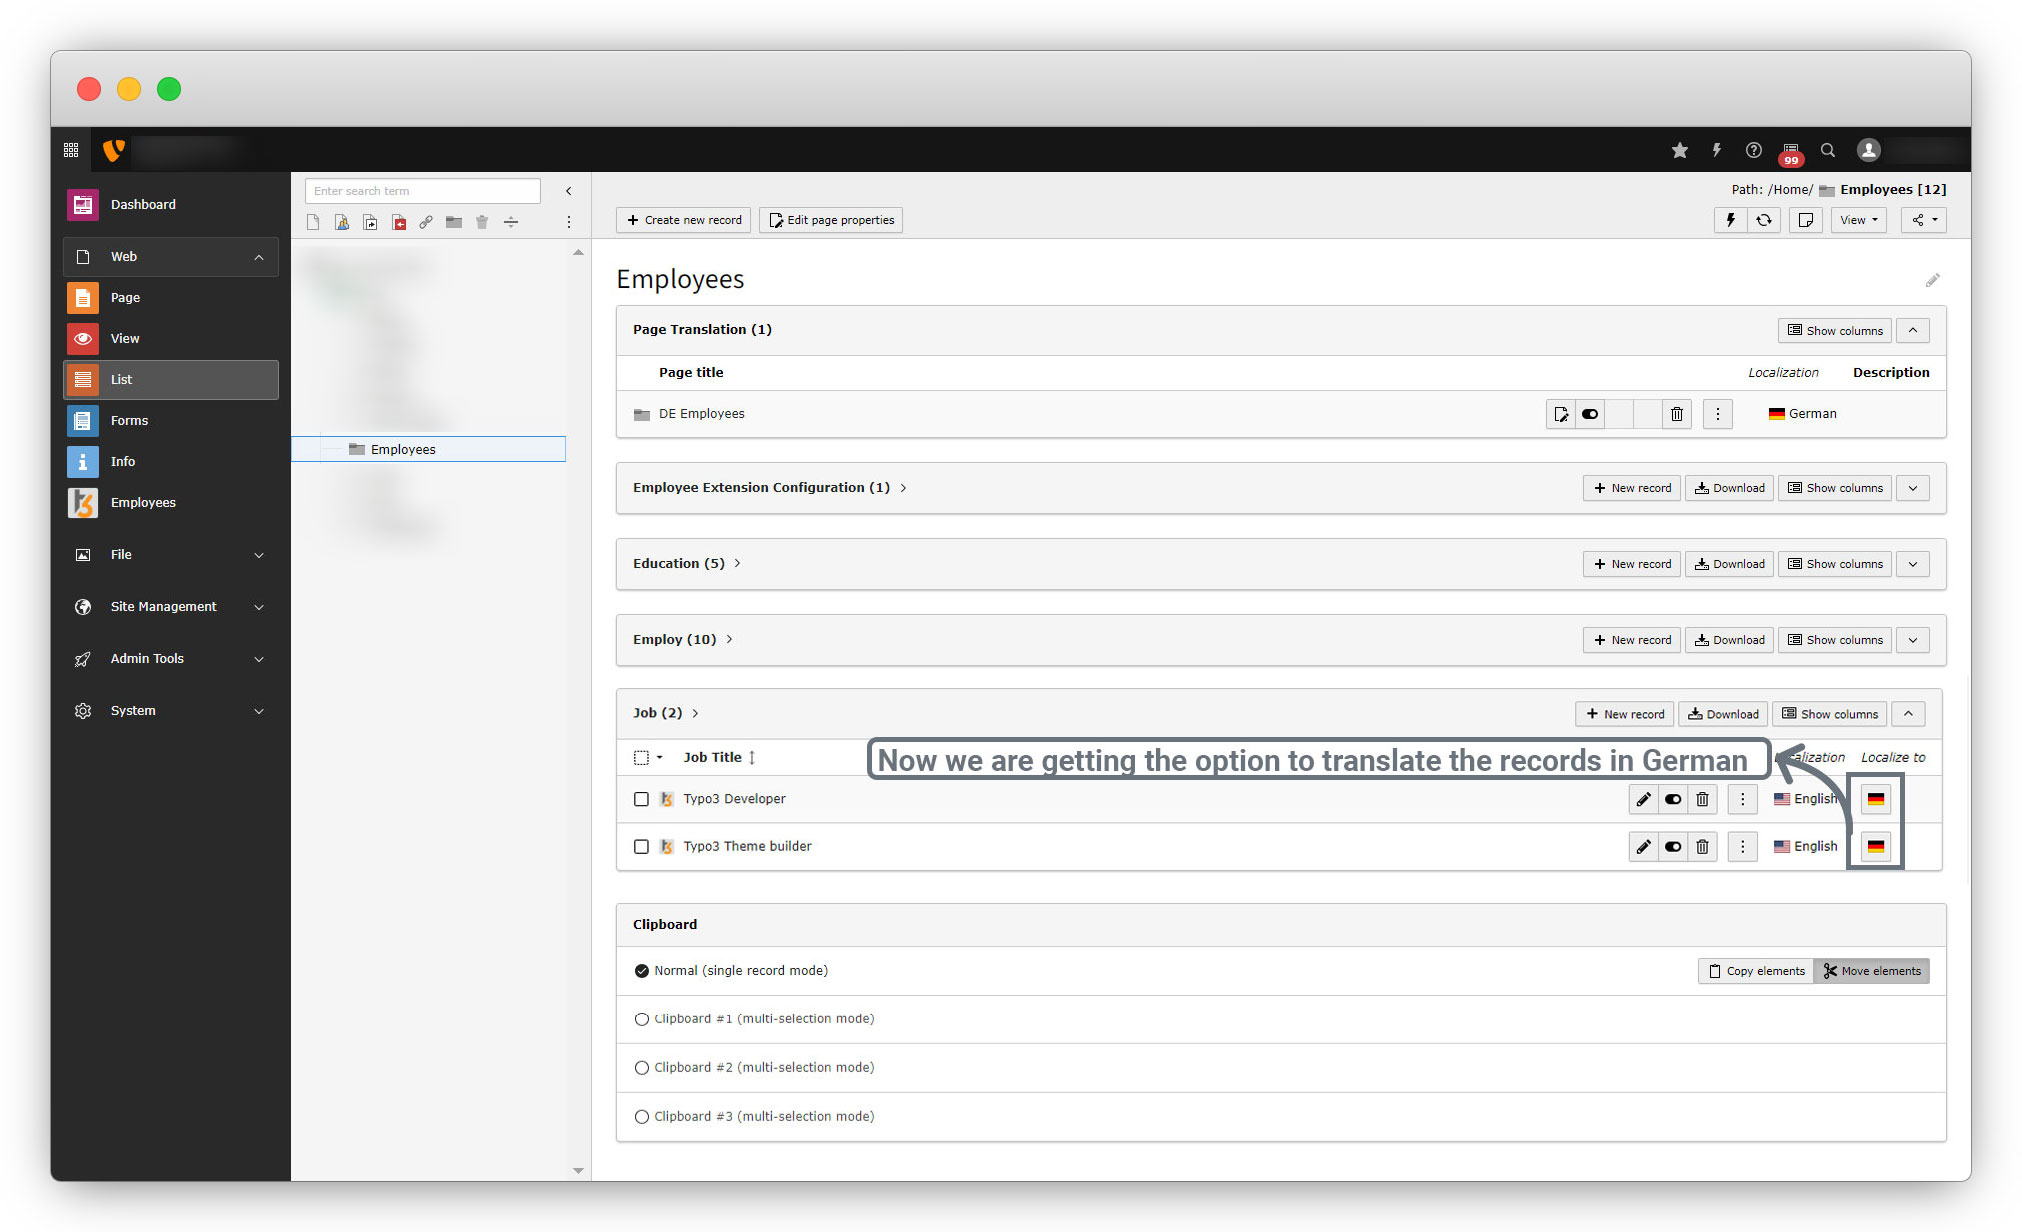
7. Now click on the German flag highlighted in the above screenshot to translate the records and you will get a form to translate the fields as seen in the screenshot below.
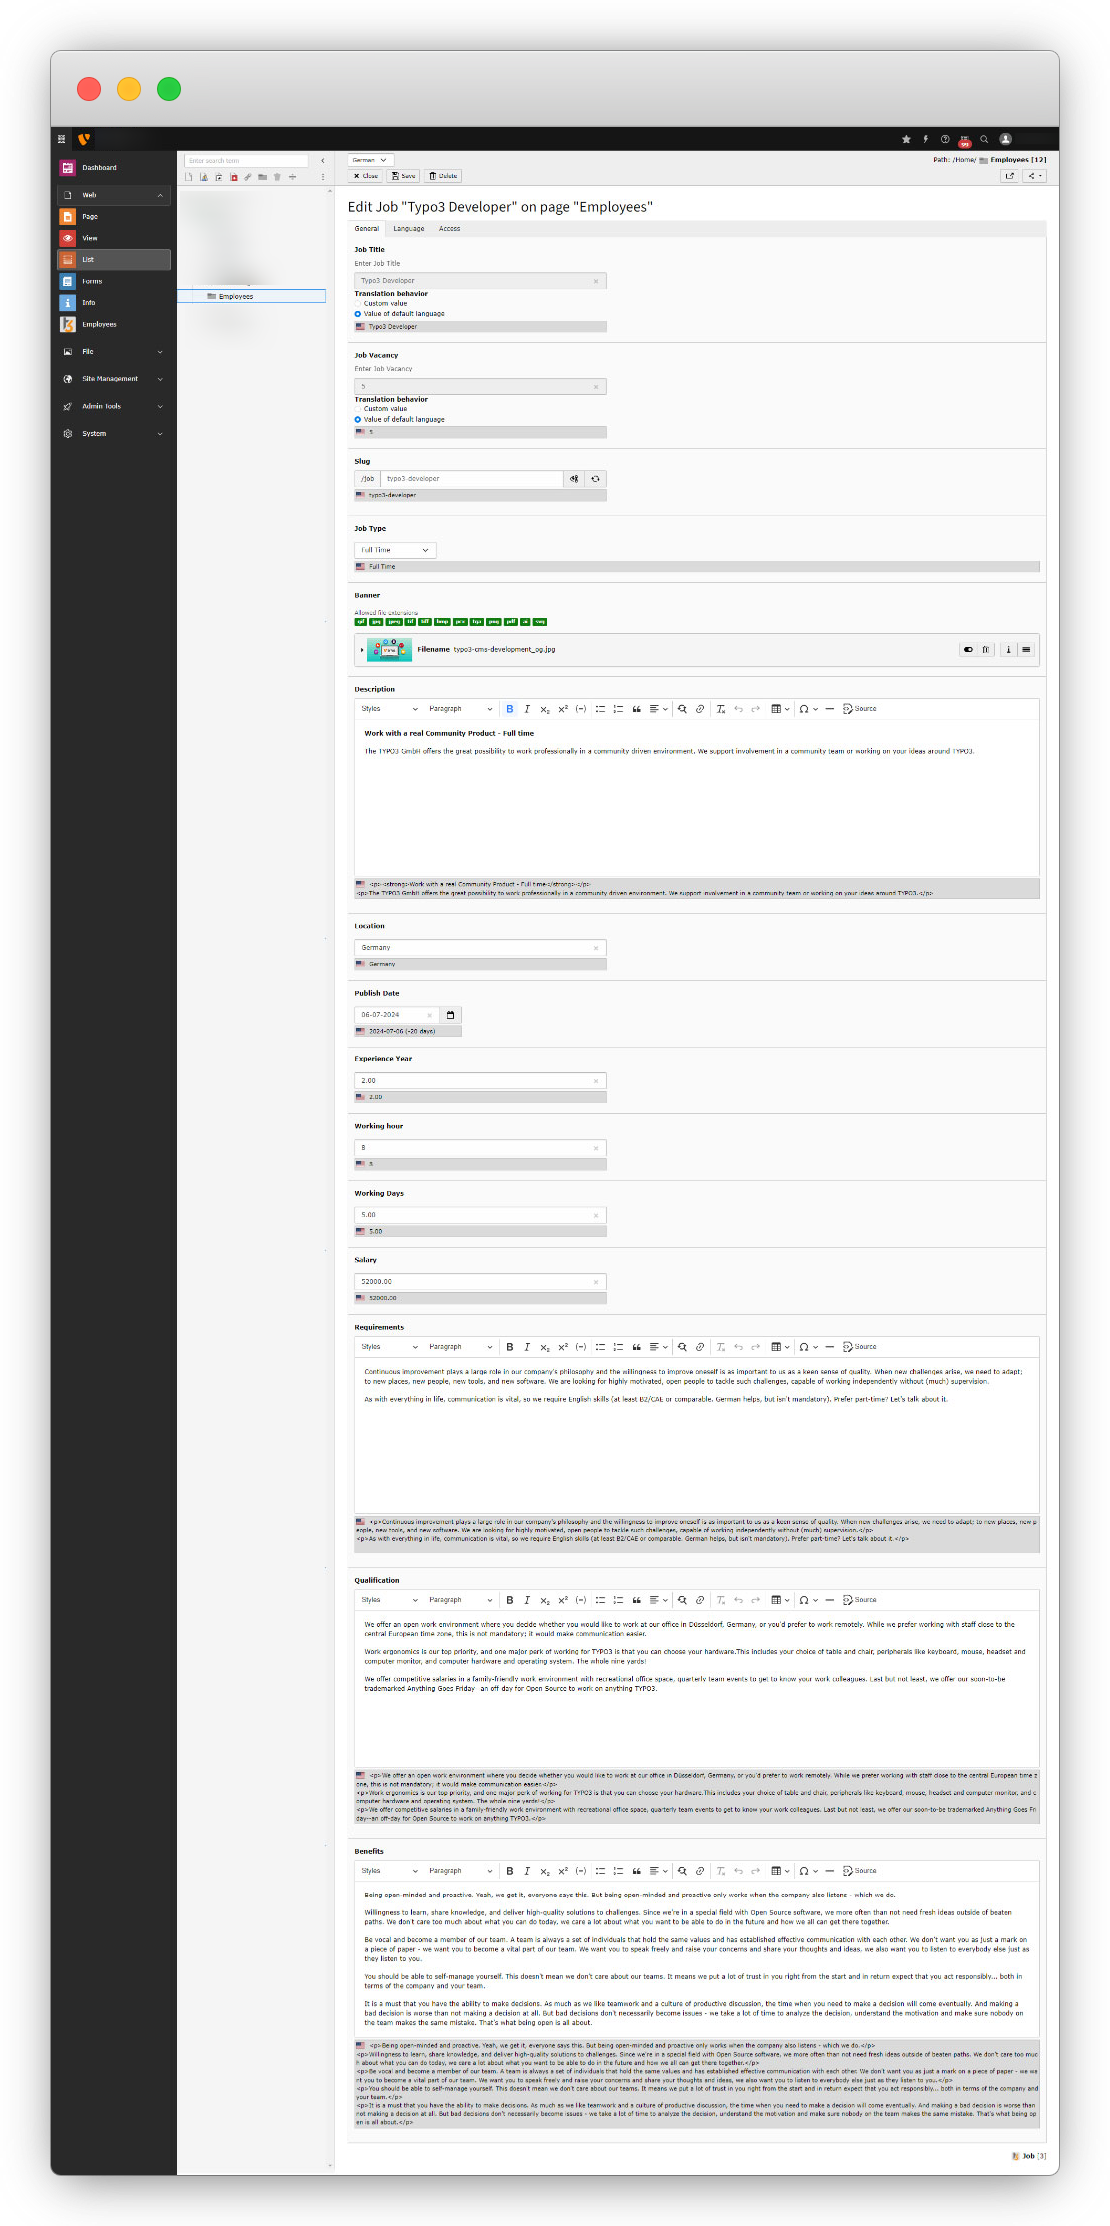
8. You can set a custom field name for the German language as seen in the screenshot below.
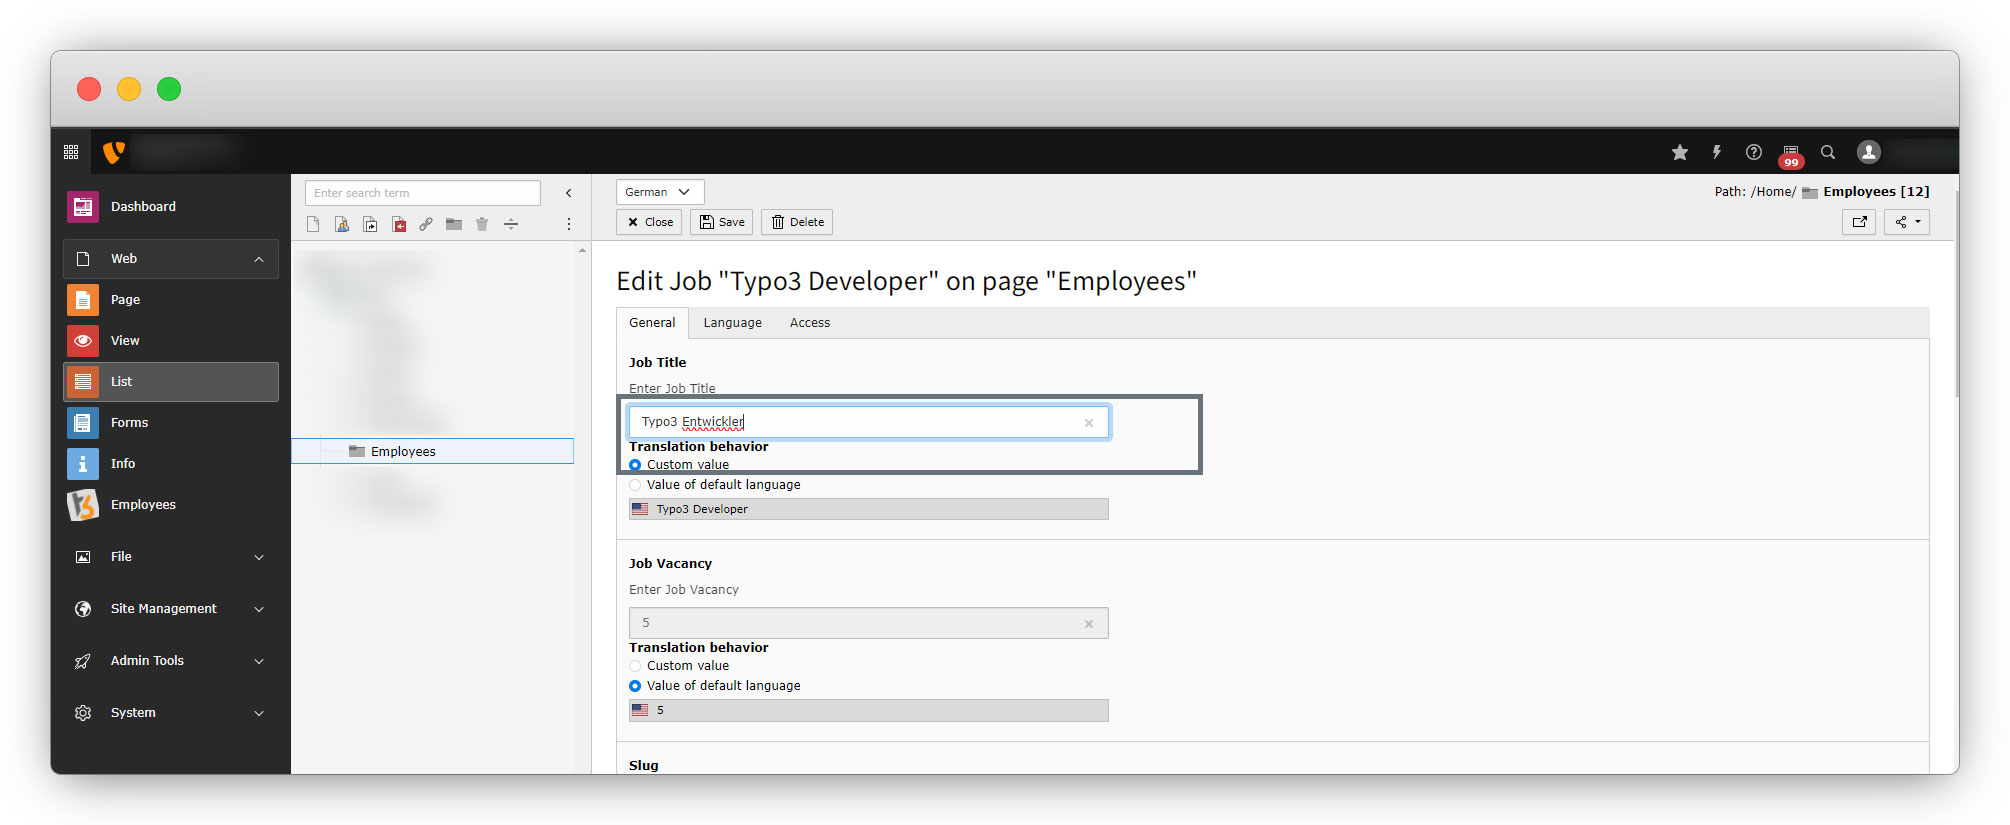
9. Set the values for all the fields for the German language here (or for whatever language you want to add) and save the page.
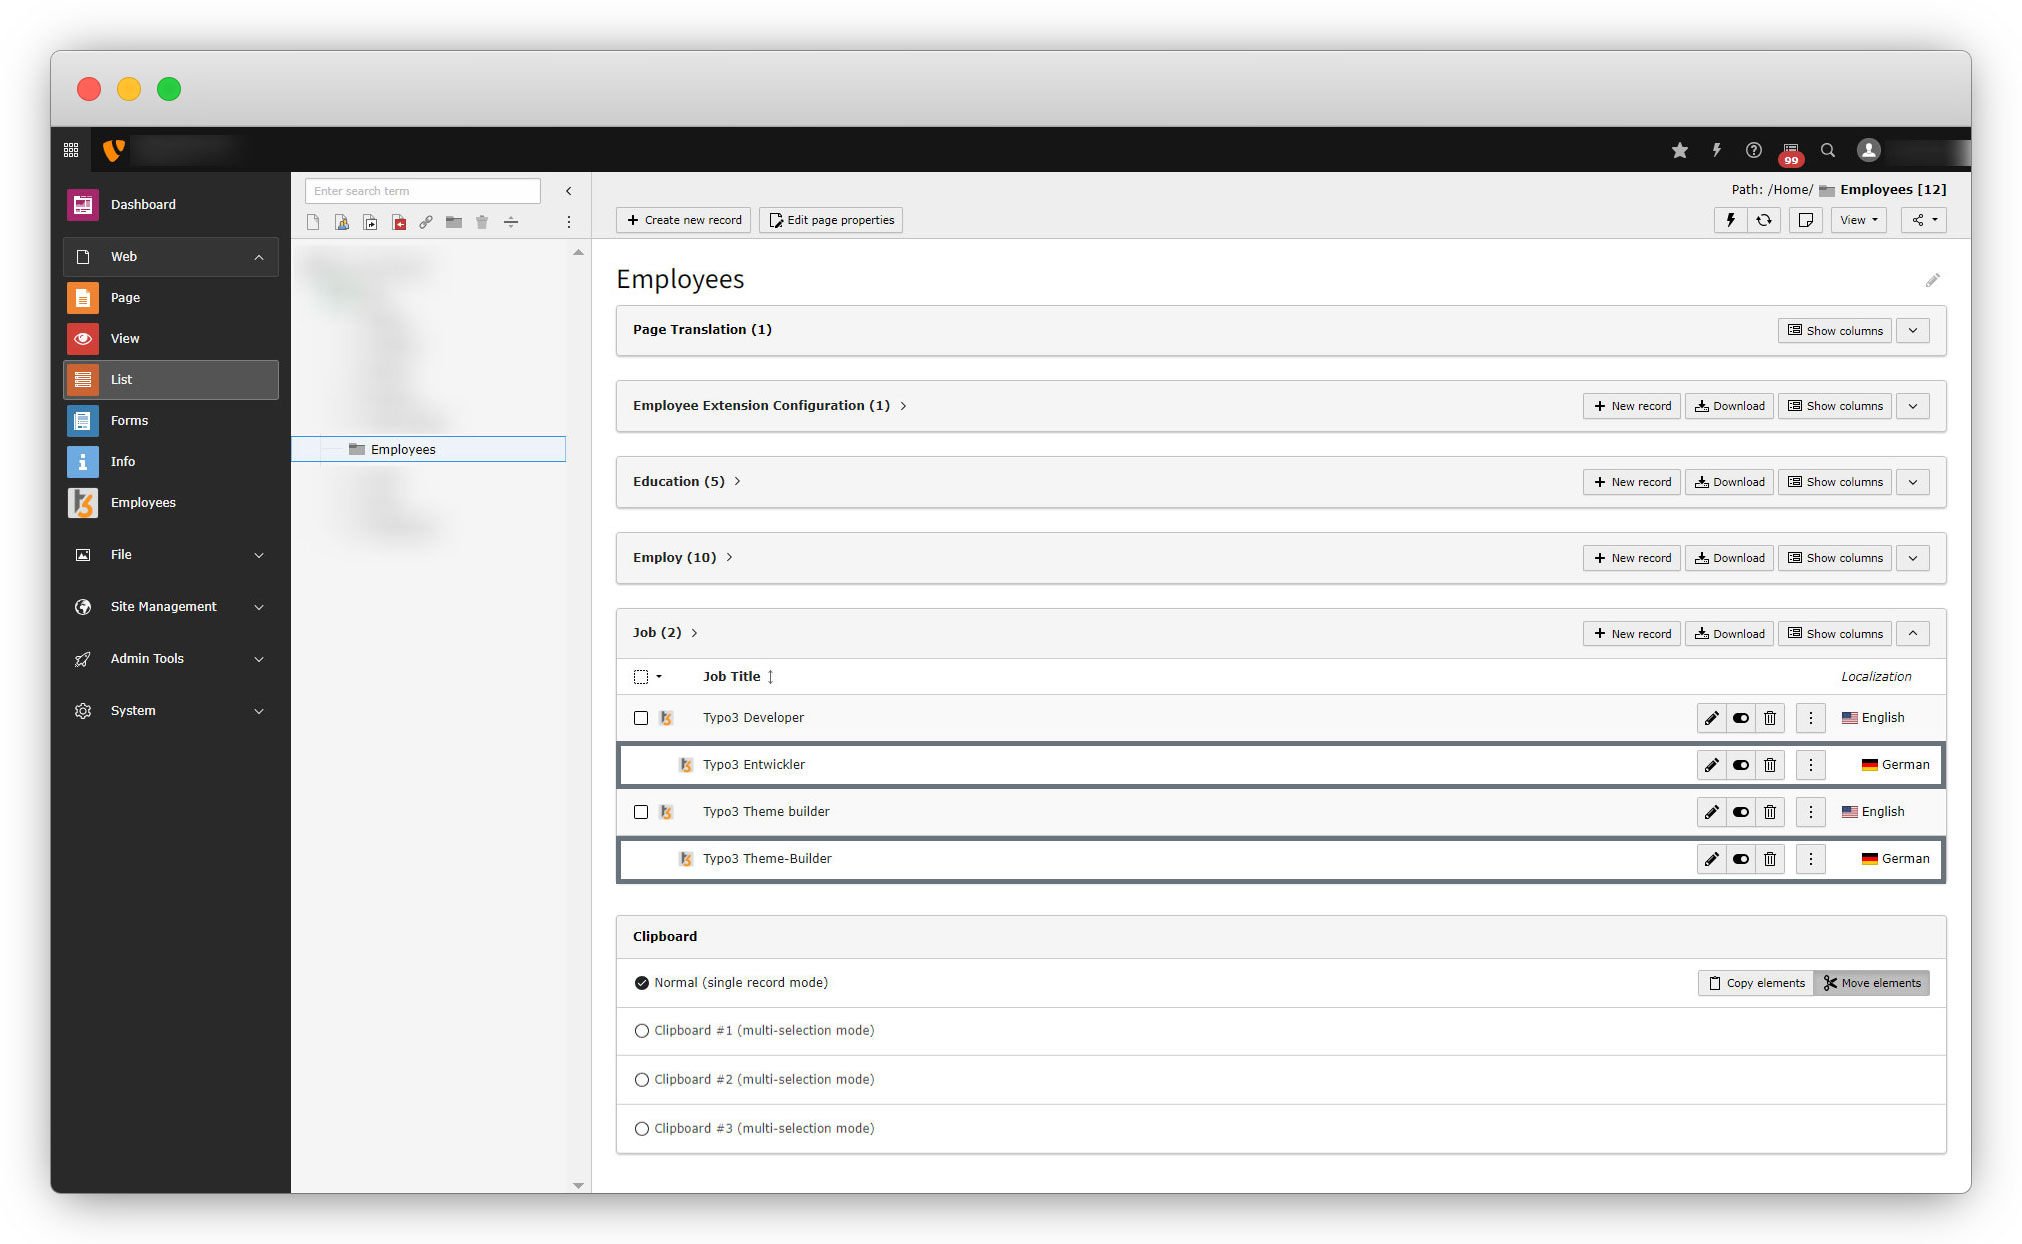
10. Reload or re-open the folder “Employees”, and you will see the translated records as seen in the screenshot below:

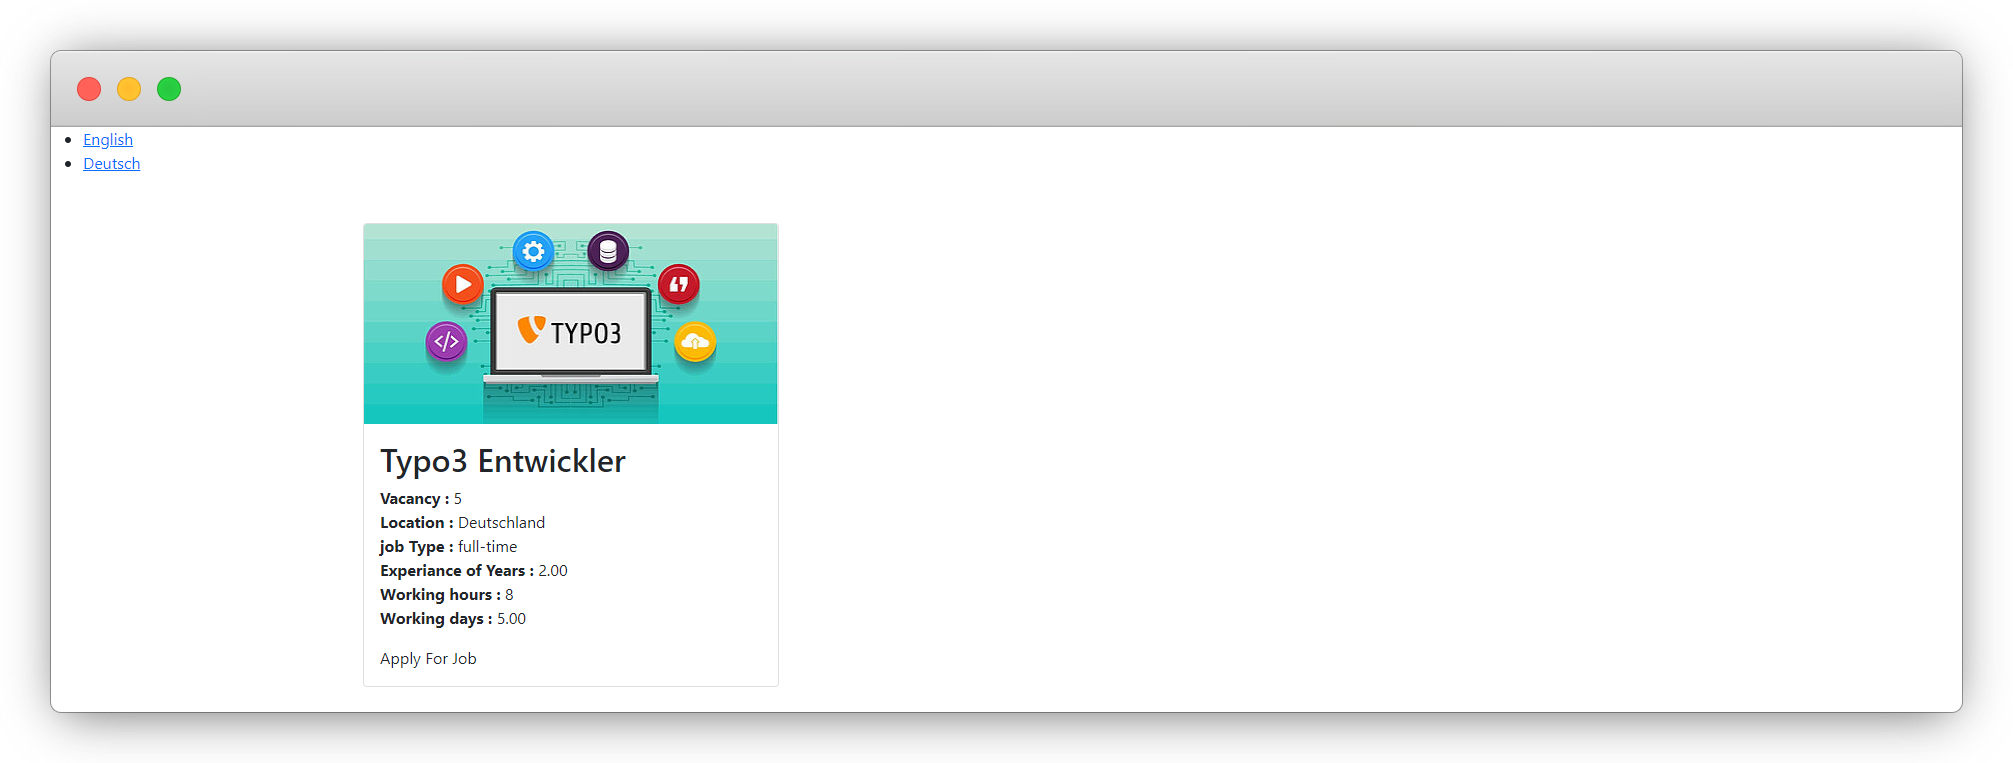
11. As you can see in the above screenshot, we still could convert just one record to the German language and getting just one record in German language in front-end as you can see in the screenshot below:
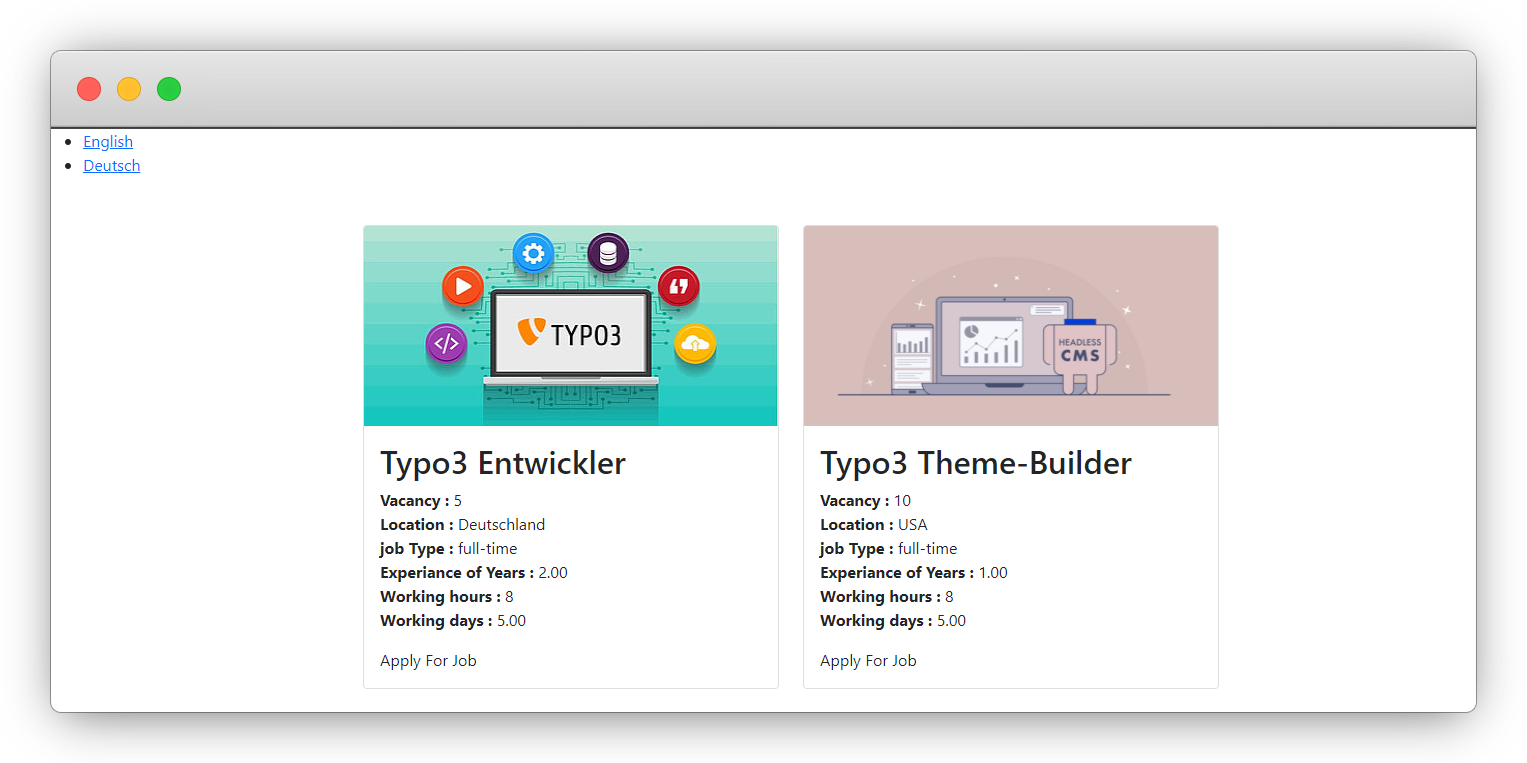
12. To translate all the records and get all the record on front-end, you will have to translate all the records as we did for the first record. After translating all the records, you will find the translated records in admin panel and also in front-end.
13. As you can see in the above screenshot, the values get translated but the labels are still not translated. To translate them we need to use viewhelper in the template file for the plugin template. Let’s check how to translate labels from the plugin template.
How to translate the plugin template
1. Let’s use viewhelper to translate the labels from the plugin template.
2. Open the job plugin template file – employeeResourcesPrivateTemplatesJobIndex.html
3. Below is the screenshot with highlighted areas where you have to use viewhelper to translate.
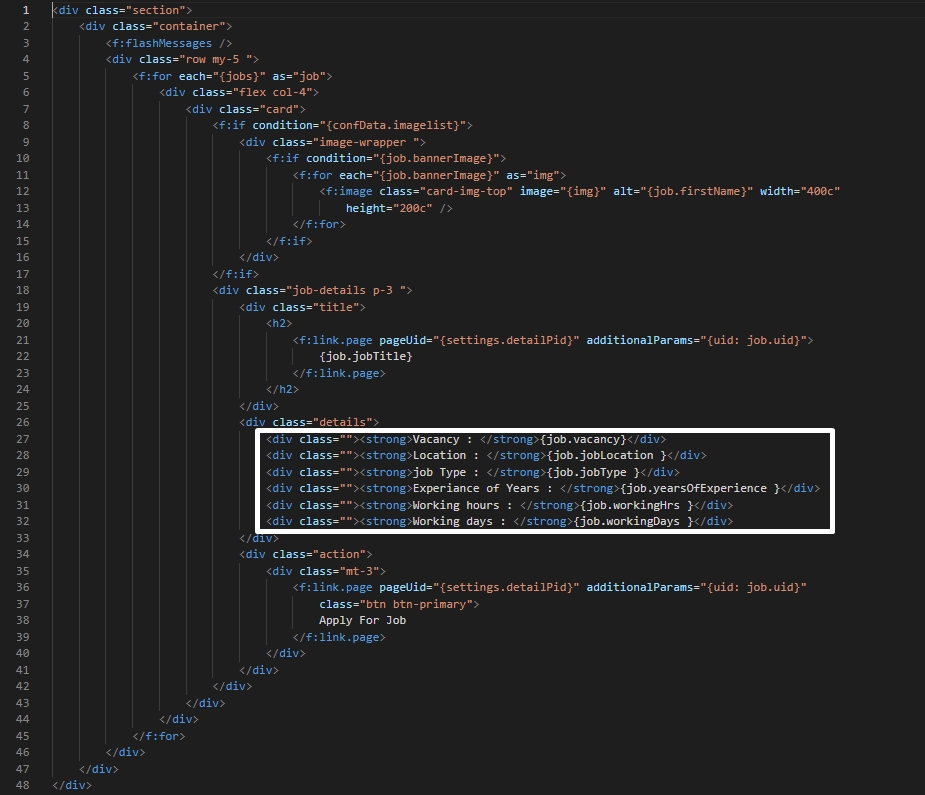
4. Replace the highlighted code with the given code below:
<div><strong><f:translate key="LLL:EXT:employee/Resources/Private/Language/locallang_employee.xlf:vacancy" /> : </strong>{job.vacancy}</div>
<div><strong><f:translate key="LLL:EXT:employee/Resources/Private/Language/locallang_employee.xlf:location" /> : </strong>{job.jobLocation }</div>
<div><strong><f:translate key="LLL:EXT:employee/Resources/Private/Language/locallang_employee.xlf:jobtype" /> : </strong>{job.jobType }</div>
<div><strong><f:translate key="LLL:EXT:employee/Resources/Private/Language/locallang_employee.xlf:yesr_experiance" /> : </strong>{job.yearsOfExperience }</div>
<div><strong><f:translate key="LLL:EXT:employee/Resources/Private/Language/locallang_employee.xlf:hours" /> : </strong>{job.workingHrs }</div>
<div><strong><f:translate key="LLL:EXT:employee/Resources/Private/Language/locallang_employee.xlf:days" /> : </strong>{job.workingDays }</div>
5. Save the file after adding the above code and reload the front-end and you will see the labels are not displaying as still we didn’t updated the language files.
6. Add the given code below to the employeeResourcesPrivateLanguagelocallang_employee.xlf file to add the English text with the Ids we added in the above code of employeeResourcesPrivateTemplatesJobIndex.html
<trans-unit id="vacancy" resname="vacancy">
    <source>Vacancy</source>
</trans-unit>
<trans-unit id="location" resname="location">
    <source>Location</source>
</trans-unit>
<trans-unit id="jobtype" resname="jobtype">
    <source>Job Type</source>
</trans-unit>
<trans-unit id="yesr_experiance" resname="yesr_experiance">
    <source>Experience in years</source>
</trans-unit>
<trans-unit id="hours" resname="hours">
    <source>Working hours</source>
</trans-unit>
<trans-unit id="days" resname="days">
    <source>Working days</source>
</trans-unit>
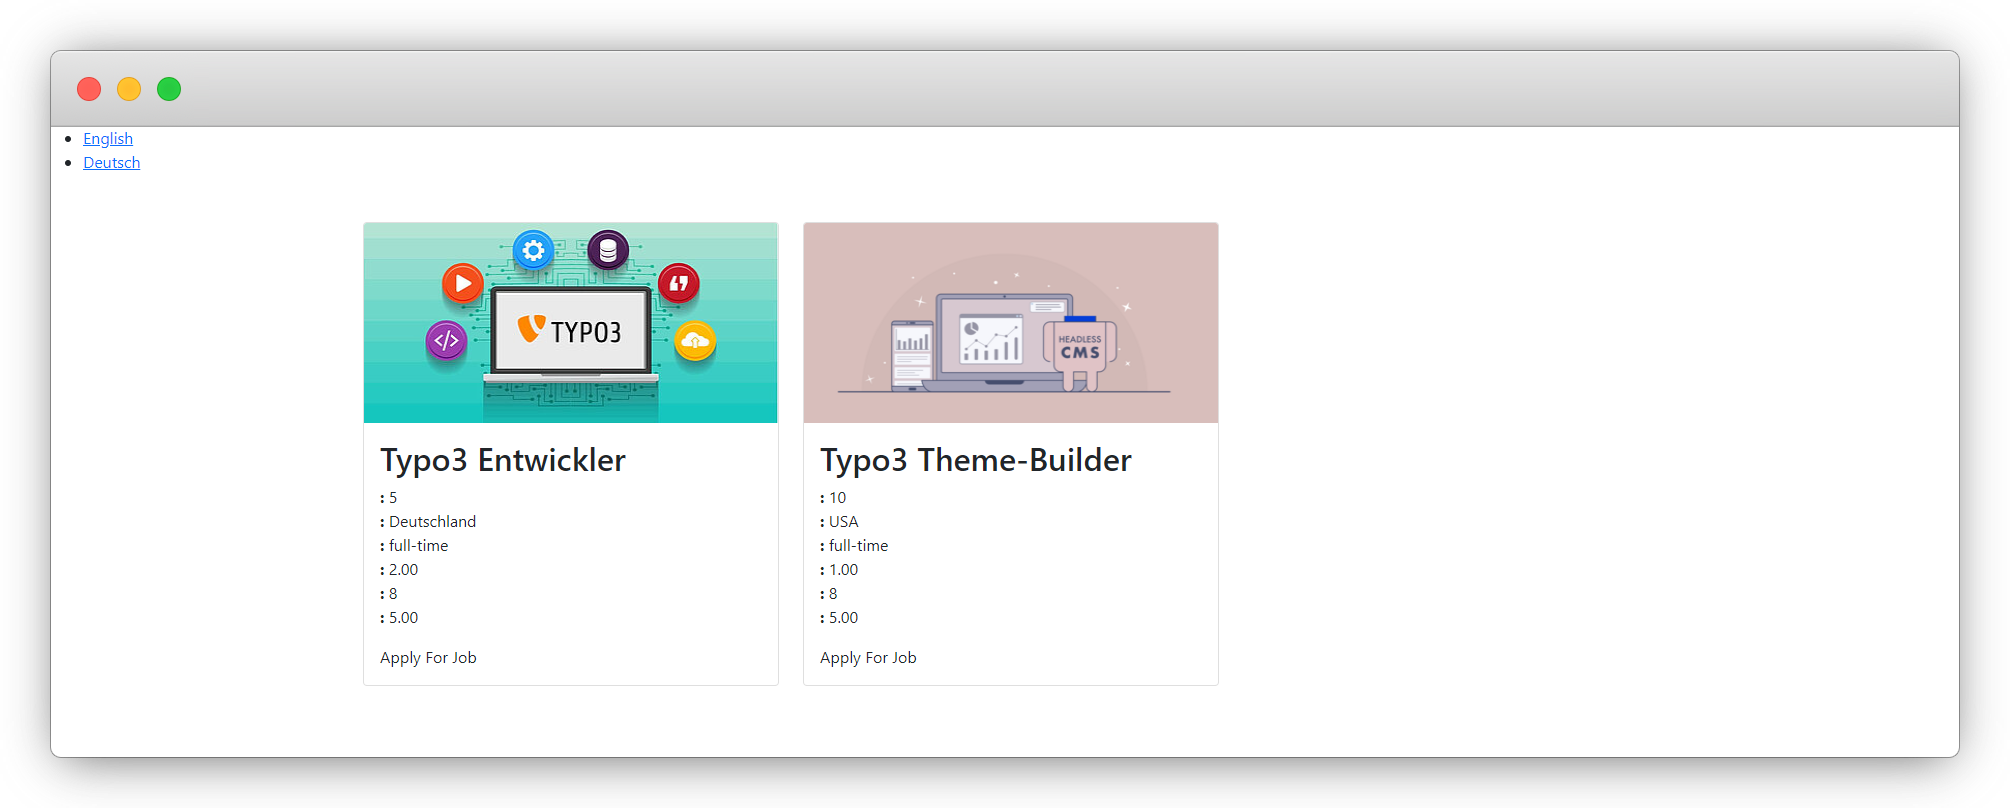
7. After above changes, save the file , flush the cache and reload the front-end and you will see the labels are appearing but in English language as seen in the screenshot below, because we haven’t added the German language file yet.

8. Now we need to create the language file for the language German. create the file de.locallang_employee.xlf, the file path is: employeeResourcesPrivateLanguagede.locallang_employee.xlf
<?xml version="1.0" encoding="utf-8" standalone="yes" ?>
<xliff version="1.0" approved="yes" >
    <file source-language="en" target-language="de"  datatype="plaintext" date="2023-02-25T07:50:45Z" product-name="employee" original="EXT:employee/Resources/Private/Language/locallang_employee.xlf"  >
        <body>
            <trans-unit id="vacancy" resname="vacancy" approved="yes">
                <source>Vacancy</source>
                <target>Stellenangebot</target>
            </trans-unit>
            <trans-unit id="location" resname="location" approved="yes">
                <source>Location</source>
                <target>Standort</target>
            </trans-unit>
            <trans-unit id="jobtype" resname="jobtype" approved="yes">
                <source>Job Type</source>
                <target>Auftragstyp</target>
            </trans-unit>
            <trans-unit id="yesr_experiance" resname="yesr_experiance" approved="yes">
                <source>Experience in years</source>
                <target>Erfahrung in Jahren</target>
            </trans-unit>
            <trans-unit id="hours" resname="hours" approved="yes">
                <source>Working hours</source>
                <target>Arbeitszeit</target>
            </trans-unit>
            <trans-unit id="days" resname="days" approved="yes">
                <source>Working days</source>
                <target>Arbeitstage</target>
            </trans-unit>
        </body>
    </file>
</xliff>
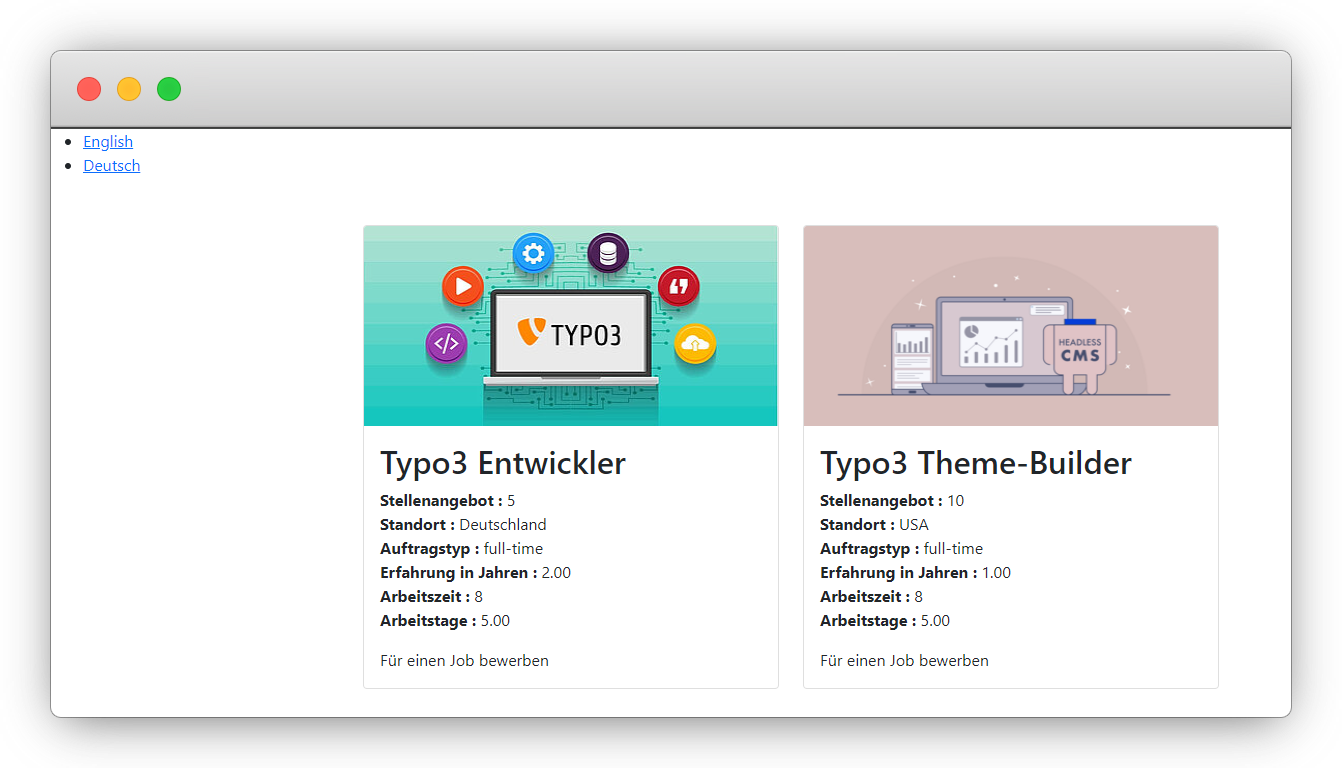
9. After save the above file flush the cache and reload the front-end and you will see the labels are translated now as you can see in the screenshot below:
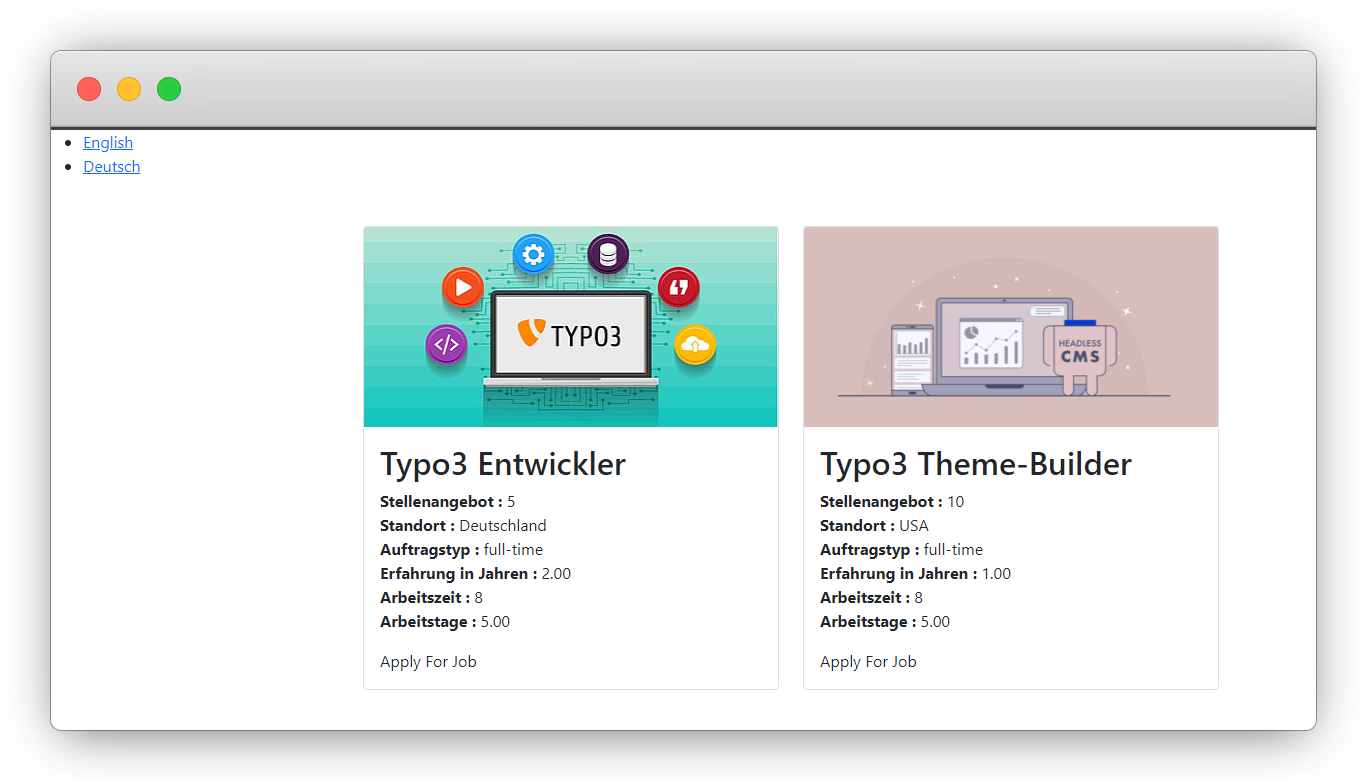
10. In the above screenshot, there is one issue that needs to be fixed, that is the button “Apply For Job” is still not rendering in German as we haven’t translated it in the template file for the Job plugin.
11. Below is the screenshot of the template file with the highlighted area that needs to be update. The file is employeeResourcesPrivateLanguagelocallang_employee.xlf
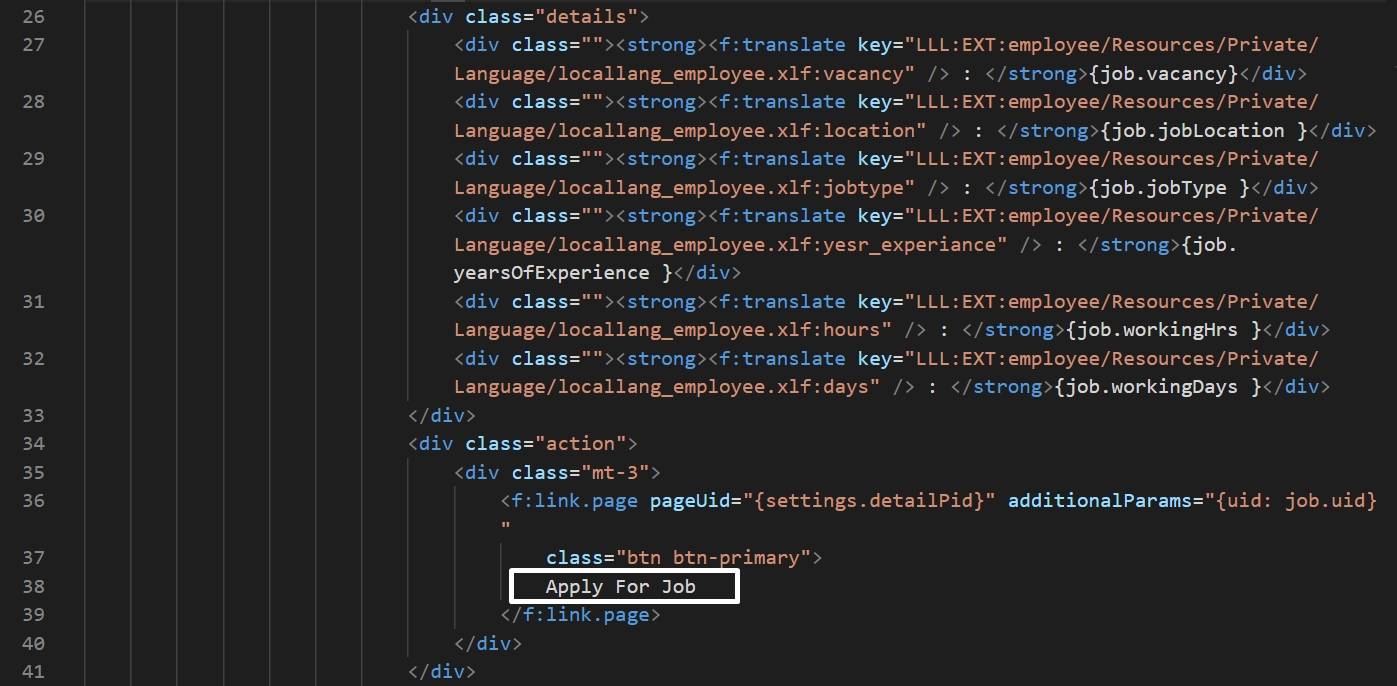
12. Replace the text “Apply For Job” with the given code below:
<f:translate key="LLL:EXT:employee/Resources/Private/Language/locallang_employee.xlf:applyforjob" />
13. Then add the below code to the employeeResourcesPrivateLanguagelocallang_employee.xlf to add the text and Id.
<trans-unit id="applyforjob" resname="applyforjob">
    <source>Apply now</source>
</trans-unit>
14. Add the below code to the employeeResourcesPrivateLanguagede.locallang_employee.xlf file we already created.
<trans-unit id="applyforjob" resname="applyforjob" approved="yes">
    <source>Apply for Job</source>
    <target>Für einen Job bewerben</target>
</trans-unit>
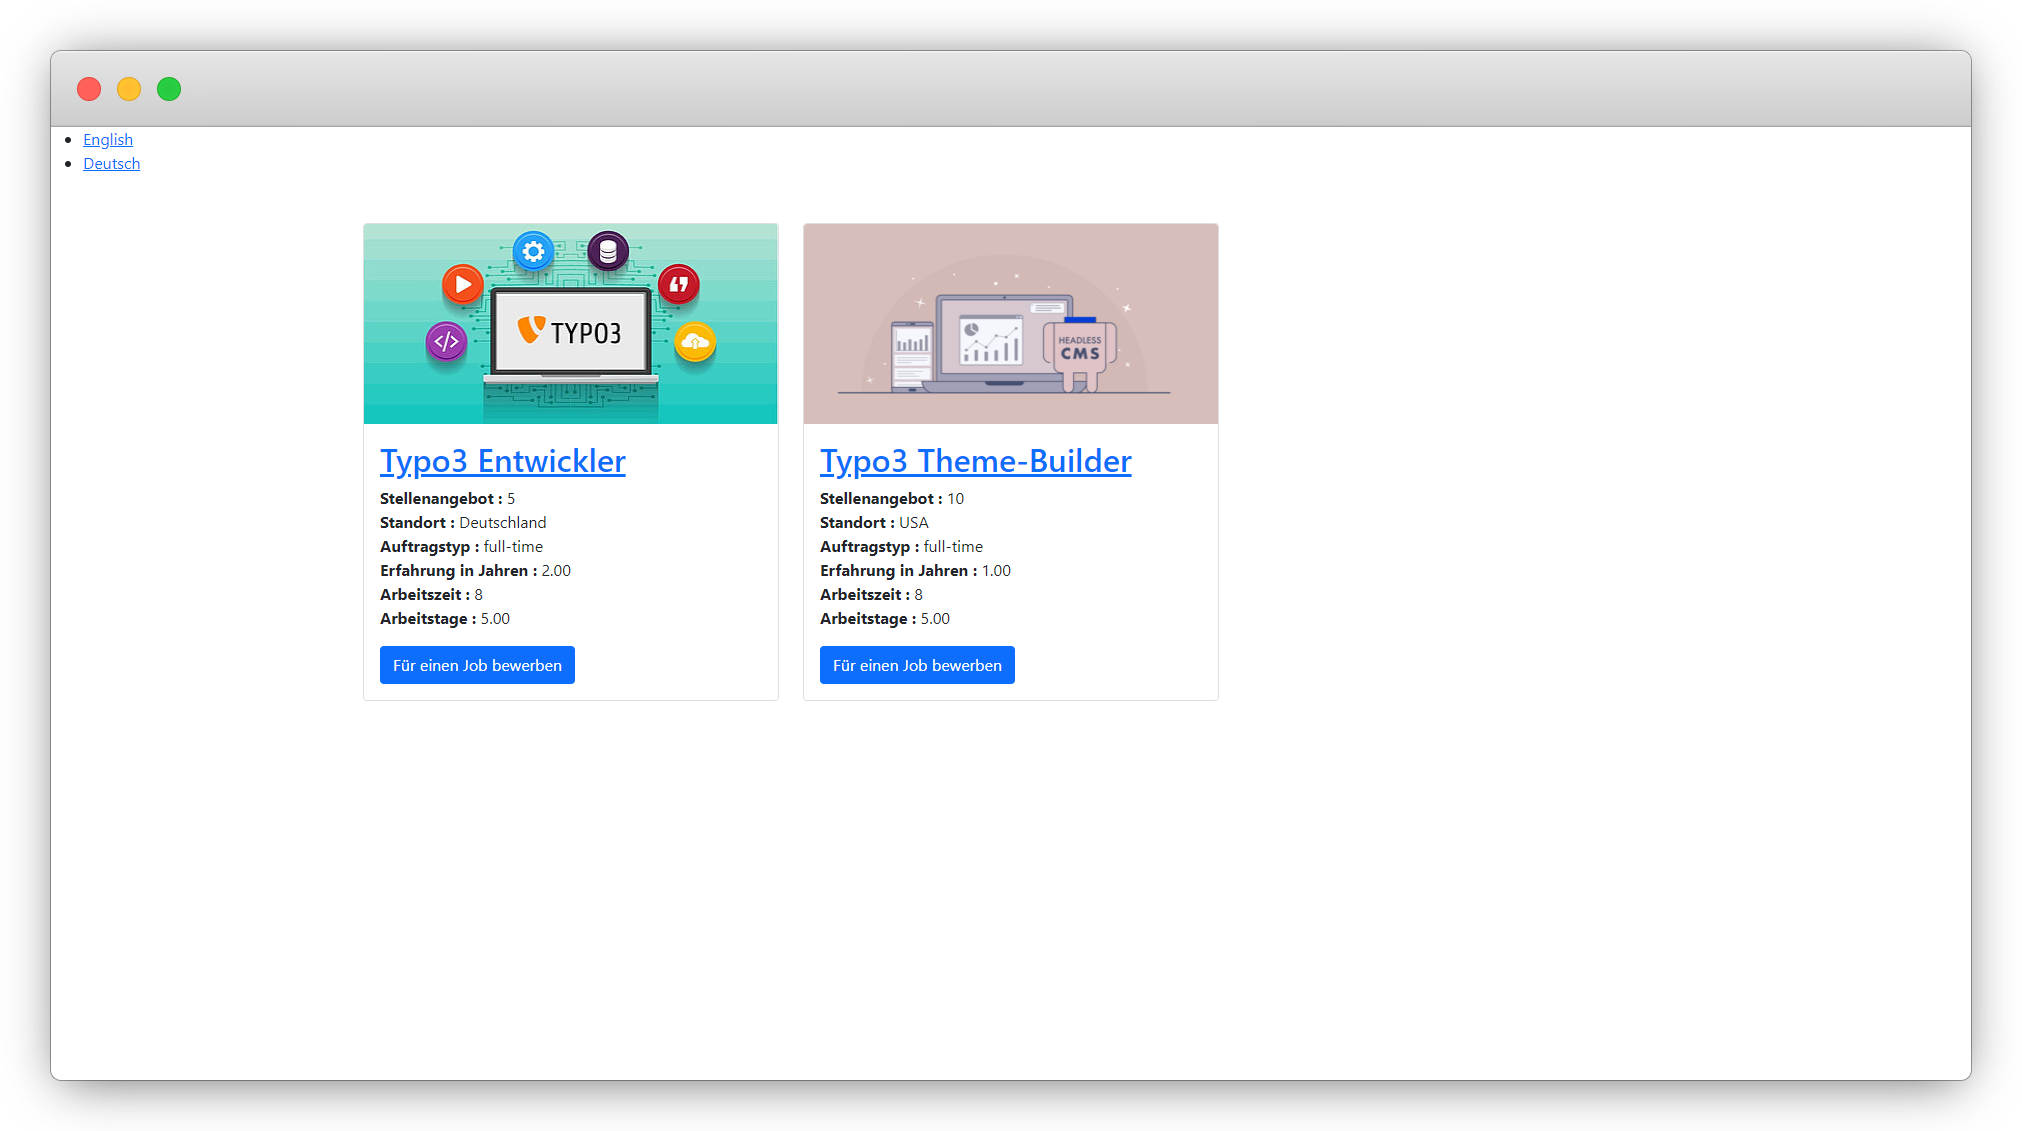
15. Flush the cache, reload the front-end and you will see the button is also translated now in German when the selected language is German.
16. But still we can not open the detail page in German language as we didn’t translated the job detail page. Go to the Web > Page > Jobs > job-detail and translated the page by following the same procedure we did for the Jobs page.
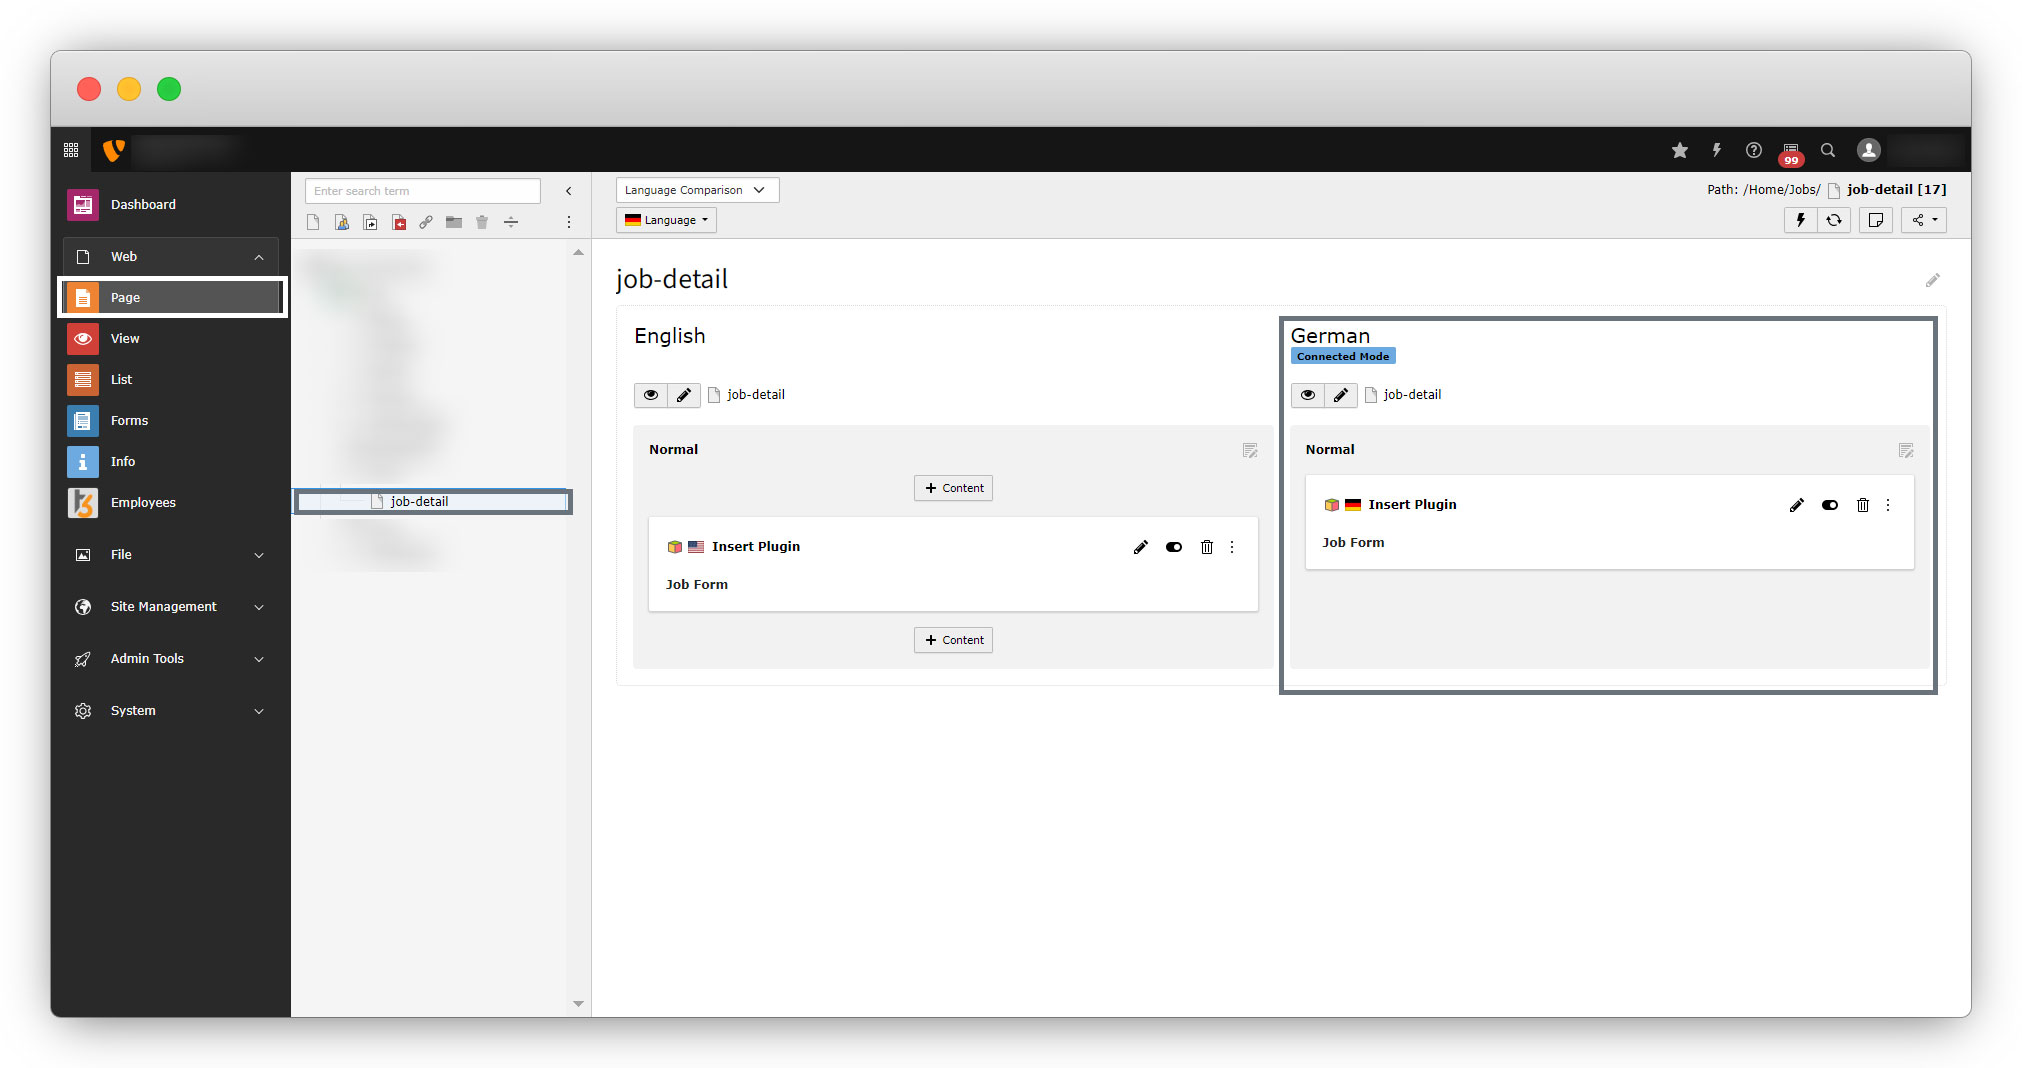
17. After translation of the job-detail page, flush the cache and reload the front-end and you will see the links for the detail pages.
Share


